Category Archives: Baking

Baking – Daniel Etherington’s bread experiements

Types of yeast for baking

3 x yeast

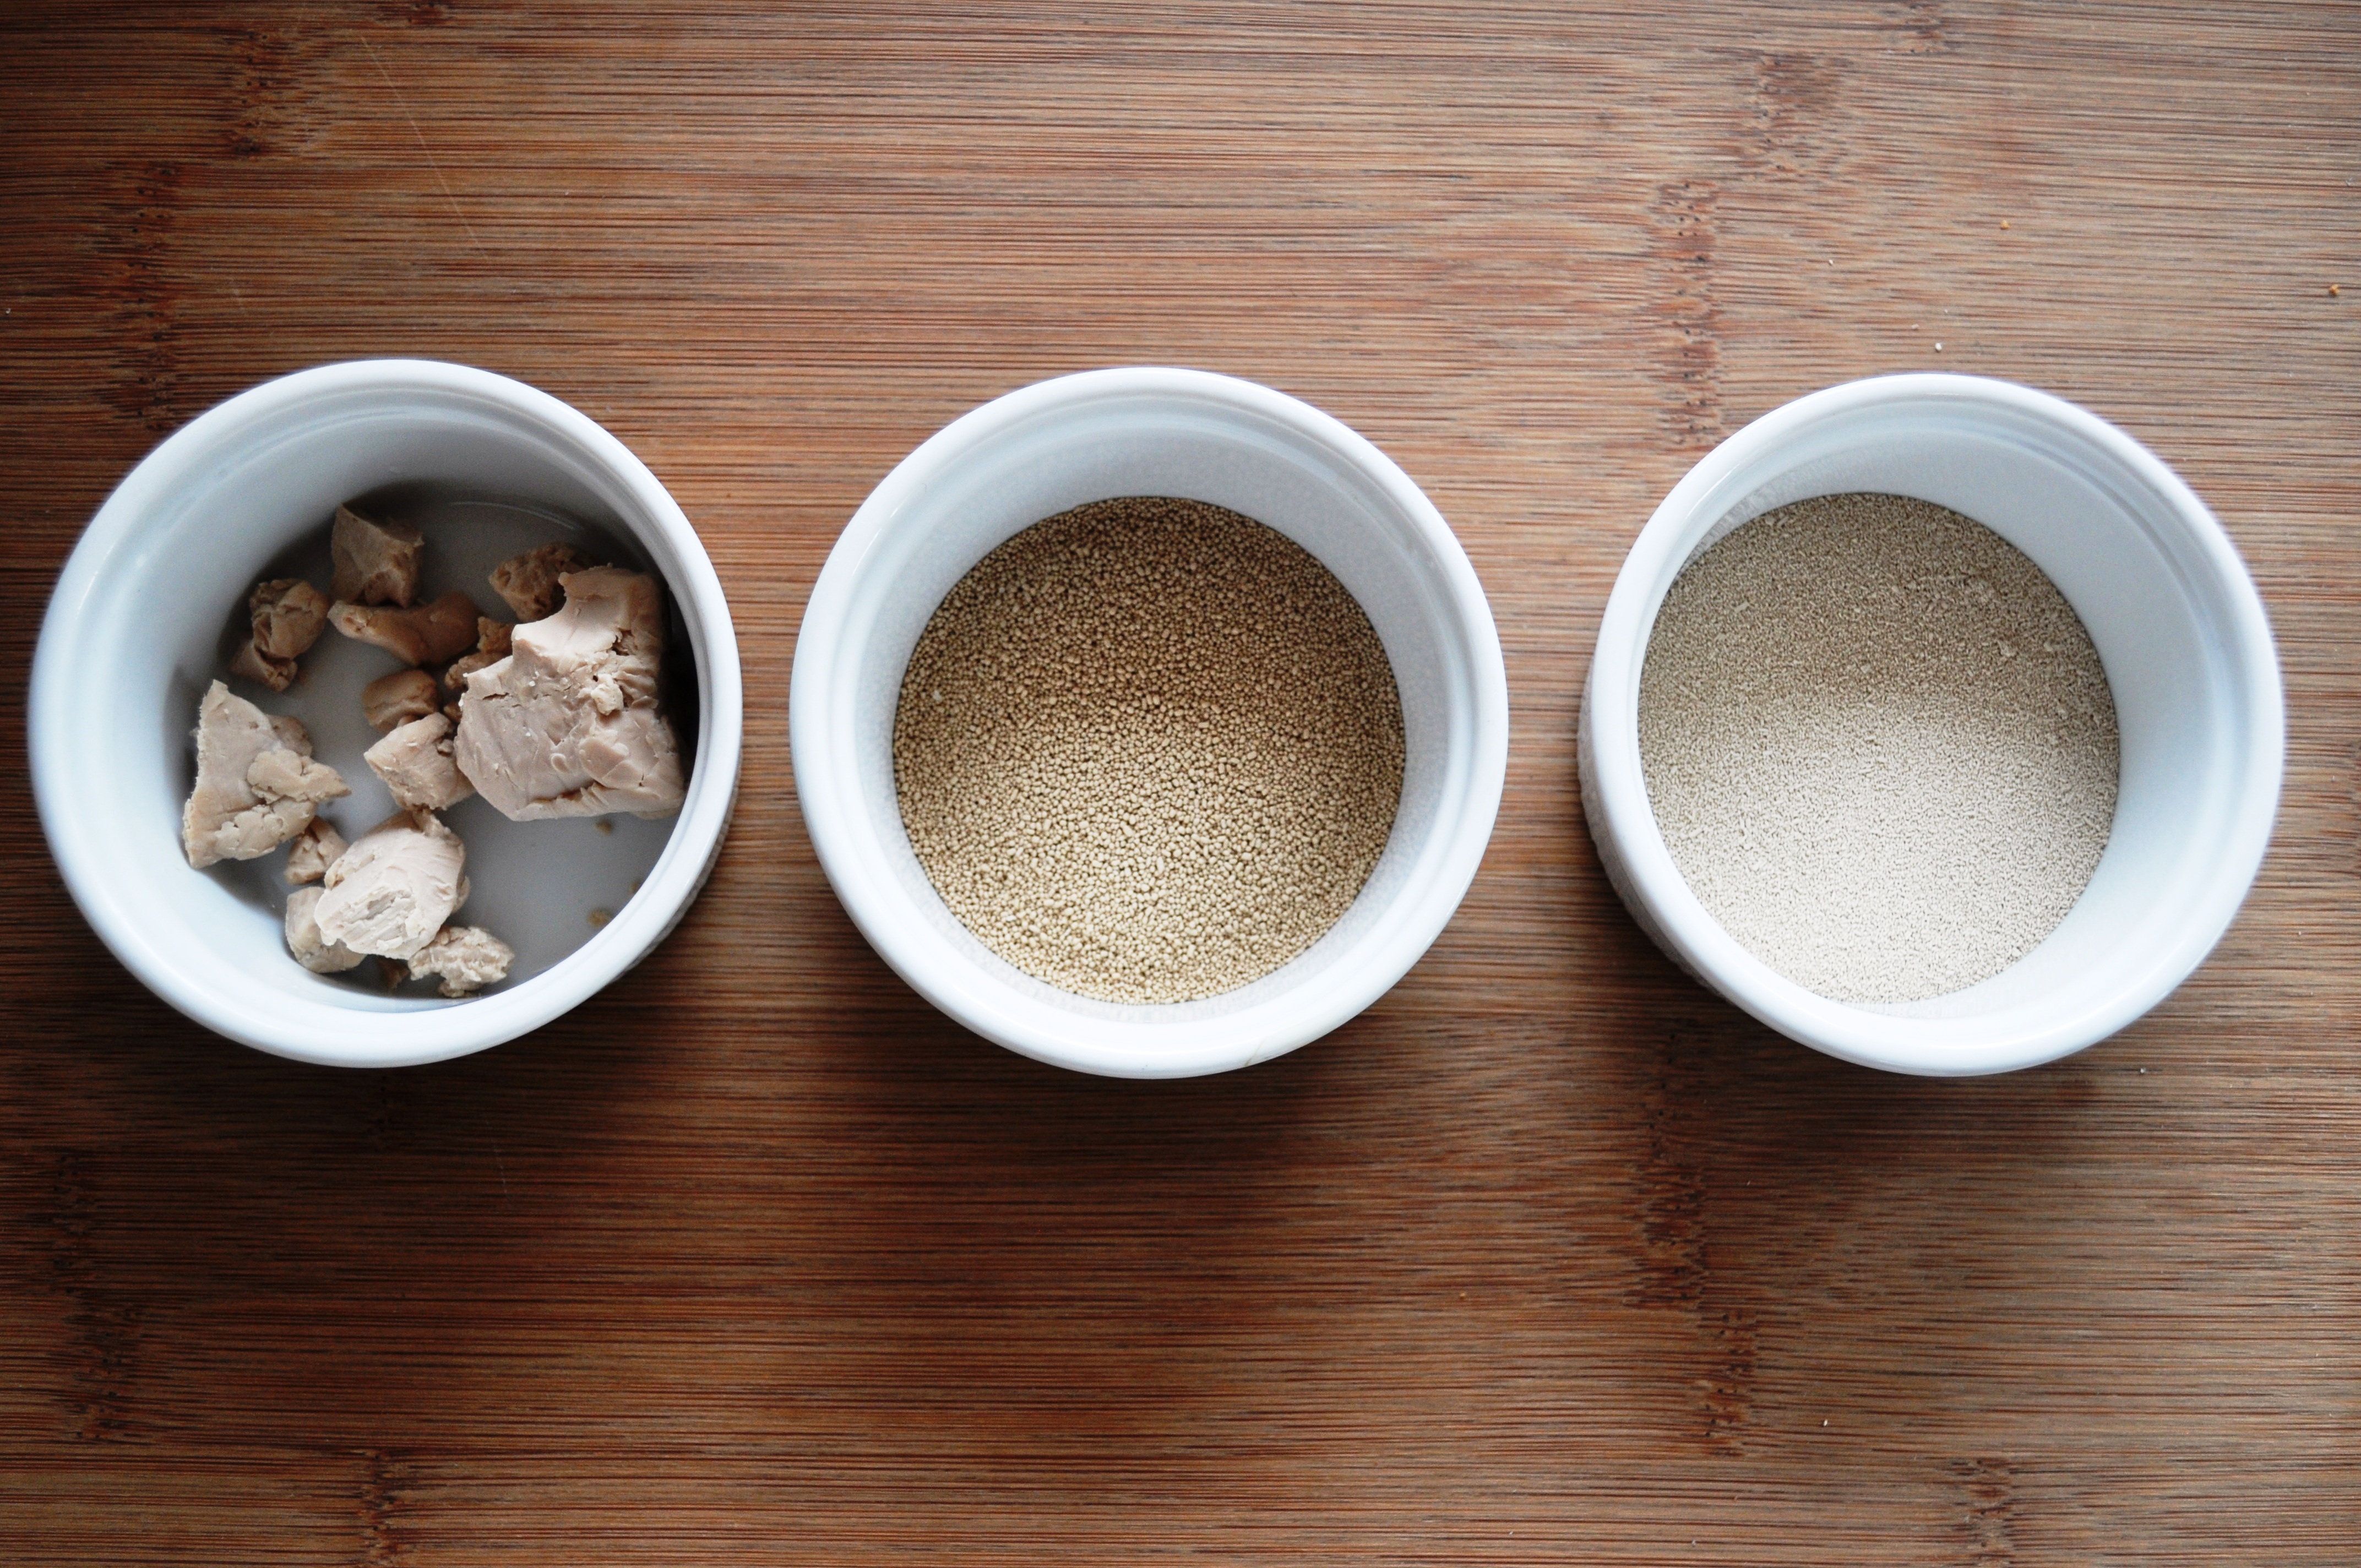
From the left: fresh yeast, active dry yeast, instant yeast

One of the awkward things about writing recipes for baked goods leavened with yeast is that there are three different types of yeast available commercially. Each has a slightly different quality, each is used in a slightly different way, and there are several different names to boot. It can make for some convoluted recipe ingredient lists.

I wrote more here about the specific species of yeast that we use for foods and our relationship with them, but here I want to look at the types of commercial yeast and how you use them.

Leaving aside sourdough / natural leavens / wild yeasts, the three yeast products in question are: fresh, active dry yeast and instant yeast.

Fresh yeast

Fresh yeast

Also known as cake yeast, compressed yeast and, in Italian, lievito di birra fresca (fresh beer yeast), fresh yeast is my preferred form. It is strangely both squidgy and crumbly.

In large scale bakeries, they may use 200g, 500g or 1kg blocks of the stuff, but for the home baker you may find it in 25g, 42g or 50g cubes or in the US I believe it comes in 2 ounce (57g) packs. Italian supermarkets stocked it, but most British ones don’t. I’ve heard that you can ask in in-store bakeries, but as these places are generally not actually bakeries – they mostly buy in pre-made dough and bake it off, rather than making it from scratch on-site – I doubt this. I get mine from a health food shop that sells it in 30g and 60g bags. You can buy it mail order easily enough (eg from Bakery Bits in the UK).

Using fresh yeast,  typically you activate it in your liquid – water, or perhaps milk if you’re doing an enriched dough. If the liquid is tepid, the yeast will form a froth after a short while. I prefer to use mine like this as I feel it makes it easier to distribute it into the flour, but Breton-born, Britain-based baker Richard Bertinet, for example, simply rubs it in as you would to add fat to flour. I’ve done this, and it works fine.

Fresh yeast is best stored in the fridge and will only last a few weeks, max. Then it’ll darken and go sludgy and not do you any favours.
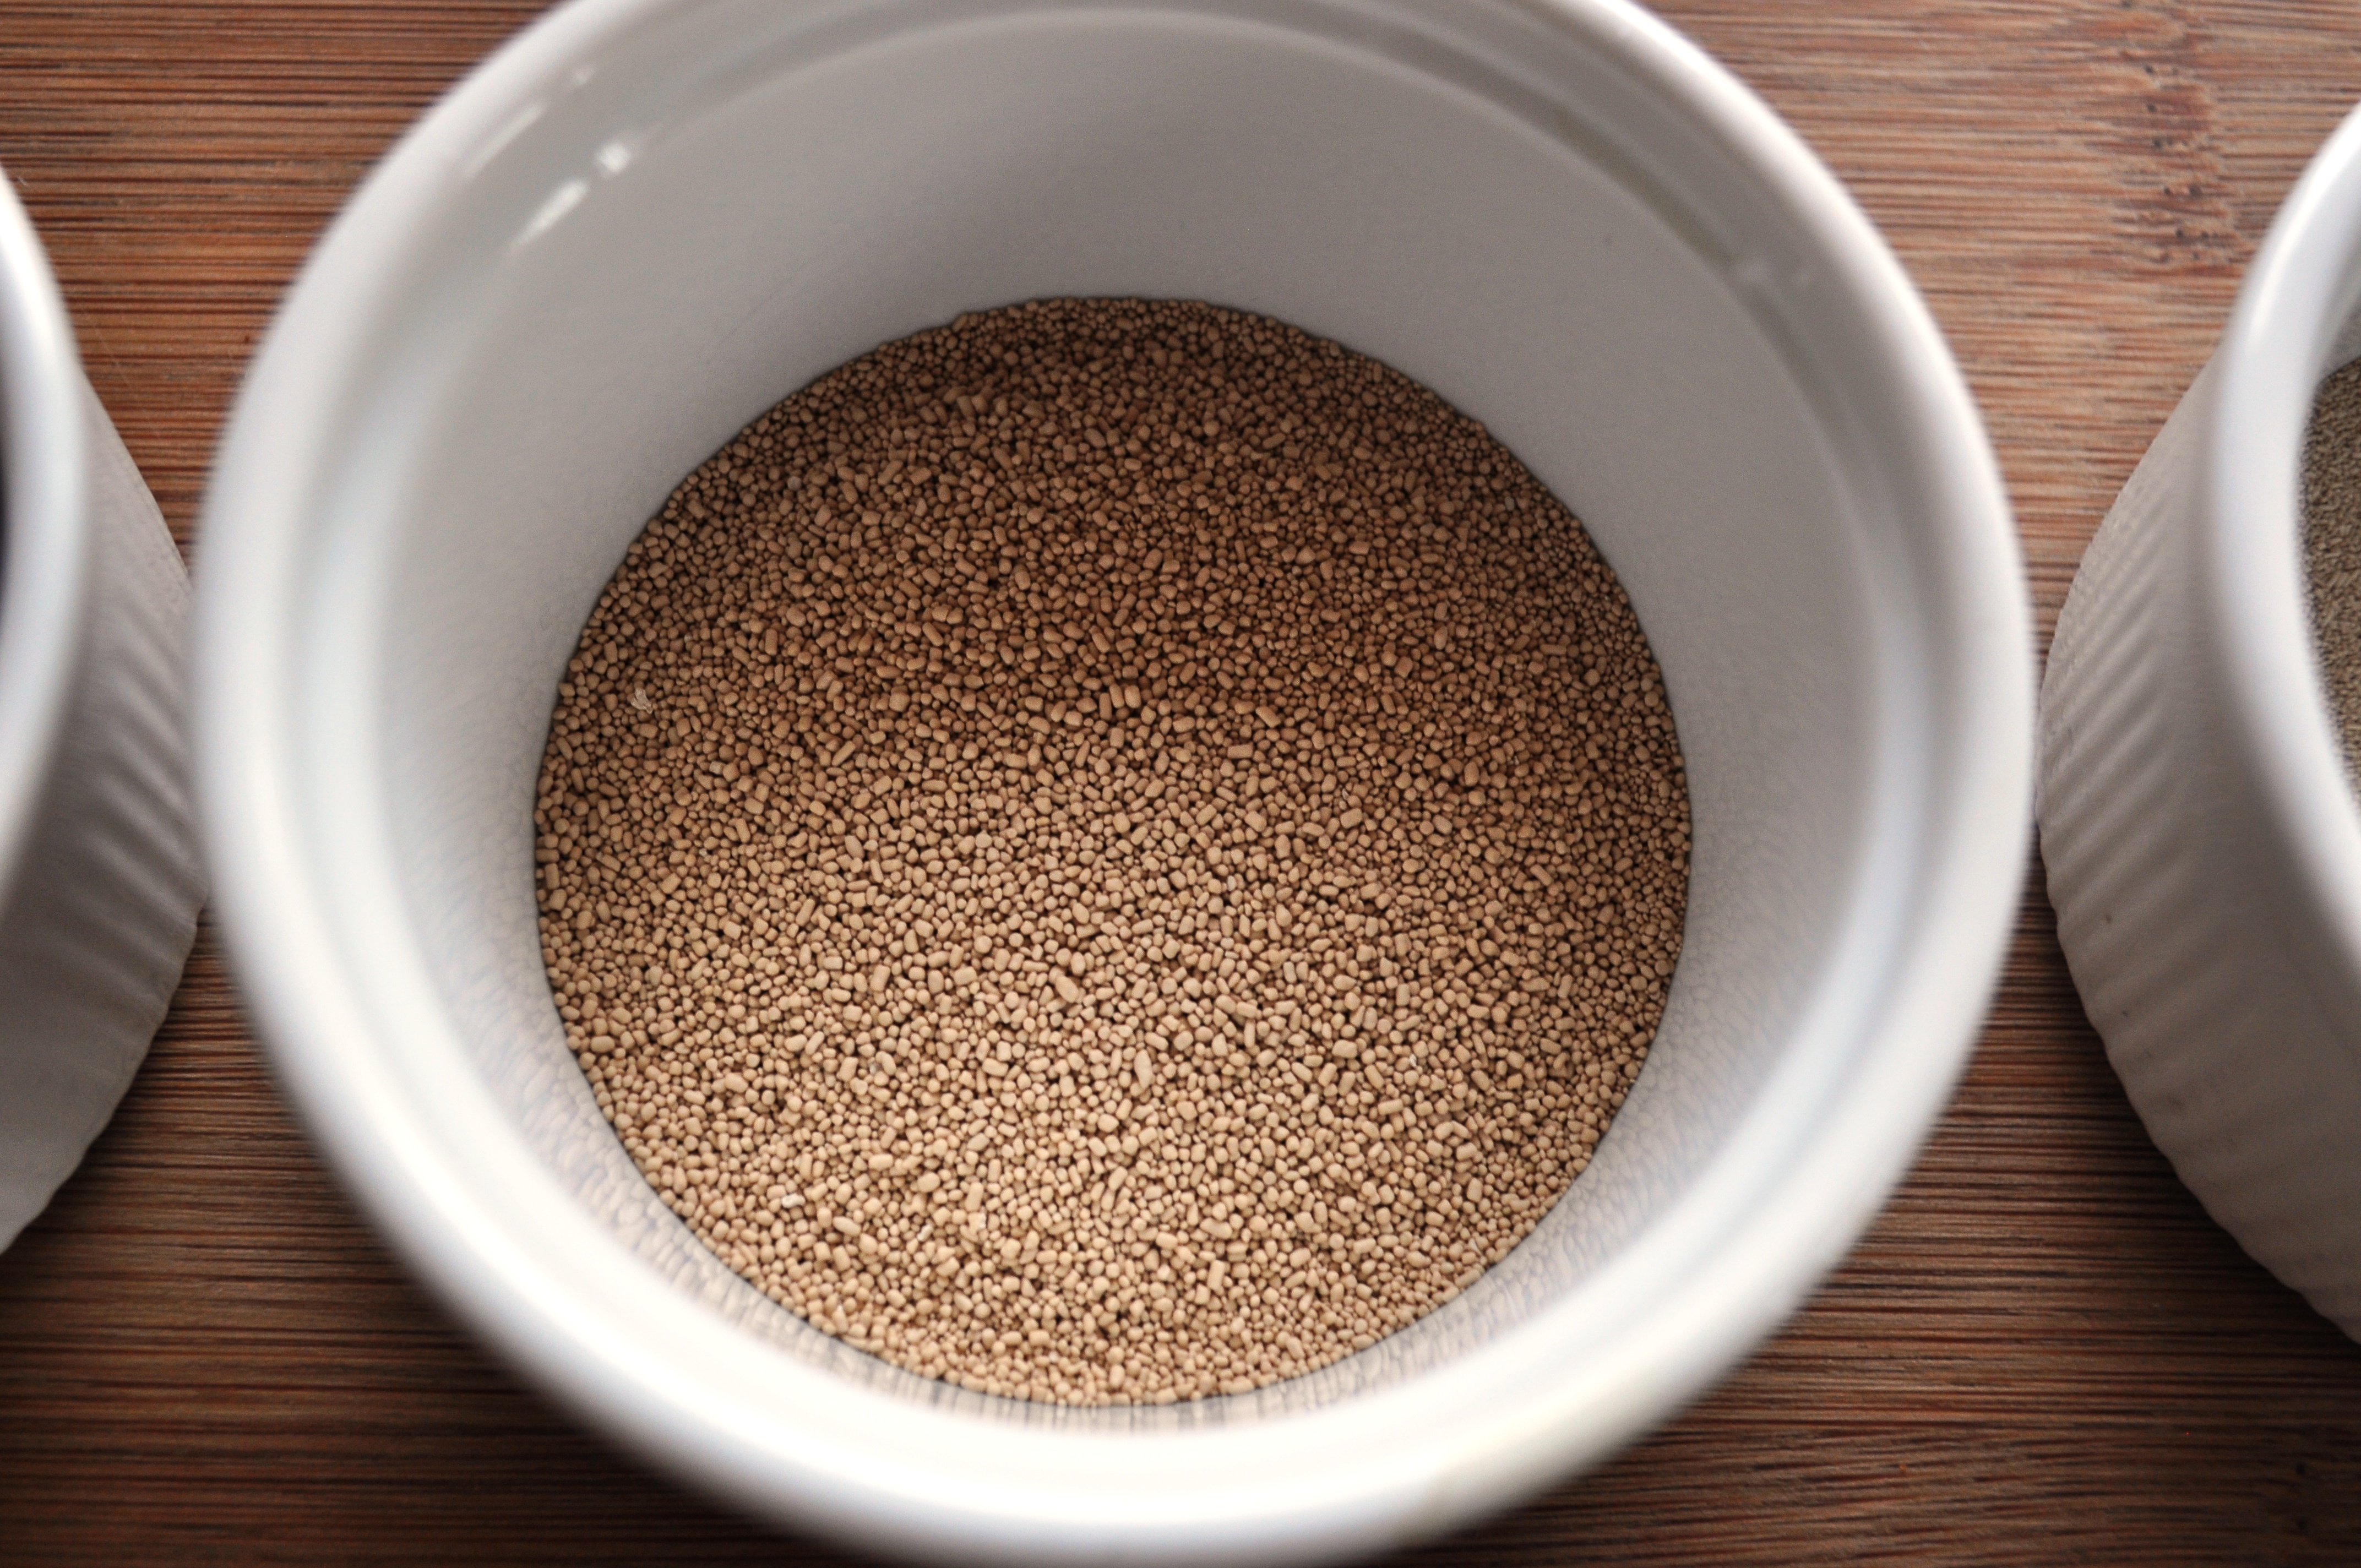
Active dried yeast

Active dry yeast

ADY was the baking yeast I grew up with – small granules that sat in the fridge door in a jar or orange tin. It doesn’t need to be stored in the fridge, but arguably that way it’ll last for months, possibly even years, as it’s pretty much inert, the live component encased within the shell of the granules.

You do need to activate ADY to use it – again by adding it the liquid component of your recipe, and letting it froth up. Adding some sugar or honey to the liquid encourages this, as it gives the yeast some immediately accessible carbohydrates to start feeding on before it gets access to the carbohydrates in the flour.

Powdered yeast

Instant yeast

Also known as easy-blend, easy-bake yeast, fast action or quick, this is another type that can, confusingly, also be referred to simply as dry or dried yeast.

It’s similar to ADY but is finer, almost powdery. I don’t tend to use this, it’s just not something I learned to bake using, or have a particular affinity for, but it’s probably the most commonplace type of yeast available these days.

You can buy it in packs, such as these 125g ones from Dove’s Farm, but most typically you’ll find it in sachets of 7g (1/4 oz), which is about 1 1/2 teaspoons and is considered a convenient amount – you’ll often find recipes with 400g flour and 1 sachet, but recipes that rush the fermentation and proving times may do, for example, 500g and 2 sachets.

The big difference when using instant yeast is that you don’t need to activate it or mix it with the liquid first – you add it directly to the flour.

Compared to fresh yeast – which is essentially a product consisting of exactly the same commercially cultivated microorganisms – instant yeast will contain additives. Nothing too scary – just ascorbic acid and sorbitane monostearate (E491), an emulsifier. Though personally I would rather use a product that’s been industrially messed around with less, even if it’s just a little bit.*

Converting between types of yeast

As with all these things, if you look around online no one is quite in agreement about how to convert quantities of the different types of yeast, but a good rule of thumb is to use half the weight of fresh if converting to ADY, and a third of the weight of fresh if converting to instant.

So for example, a recipe that calls for 20g fresh yeast you could replace that with 10g ADy or 7g instant yeast. Or as percentages where fresh yeast is 100%, ADY is 50% and instant is 33%.

Of course, as you learn more about baking you’ll learn more about these variables – so for example, if you do a longer fermentation, you may be able to reduce the amount of yeast in a recipe and just leave the yeast to keep working. If you want a quick loaf (which I don’t recommend, because long fermentation = more digestible = less issues with wheat), a recipe may call for a much higher proportion of yeast.

My basic recipe made with commercial yeast works with these quantities:

1000g flour (100%)
350g water (70%)
20g fresh yeast (2%) or 10g ADY (1%)
20g fine salt (2%)

Addendum

If you’re interested in food history – as I am – Dorothy Hartley’s round-up for yeast types from her 1954 book Food in England is an noteworthy comparison. She lists five types of yeast:
Brewer’s Yeast – made by “the brewer’s wife; and sold to the farmer’s wife at market, to which it was carried in earthenware jars.” This is what we’d call barm, and something I’ve experimented with thanks to a supply from my brewer friend Michele.
Dry yeast – for storage or use aboard ships, “made by spreading the yeast out on a wide board, and more on top, over and over, as it dired, till it was a couple of inches thick.” It was then cut into pieces and stored, then reactivated in warm water as we commonly do with fresh yeast.
Potato yeast – potato boiled “and pounded up with some treacle and their own boiled water” with a little yeast added. So not really a type of yeast in itself, more of a medium. Although if left, such a mixture will develop its own wild yeast culture – this is the technique used for Maori rewena bread.
German yeast – imported from Hamburg then later Holland. “It was introduced in about 1850, and by 1866 we imported 5,735 tons in a year.”
Modern yeast – “obtained from a grocer will have a fresh clean smell, and be cool and firm.” She describes breaking it up and activating it in sweetened water, so it actually sounds like fresh yeast.

Possibly creating confusion, in The Last Food of England (2007), Marwood Yeatman says “Compressed yeast, known to the Victorians as ‘German’ or ‘dried’, and which we call ‘fresh’, is descended from brewer’s yeast.”


* All these yeasts are industrially cultivated of course, fed sugars and pushed through a series of tanks, vats and fermenters, sealed to prevent any contamination from wild yeasts. But it’s a matter of degrees and where you prefer to draw your line as the number of additives in our foods increases, even in tiny incremenents. I strongly believe the ever-increasing industrial processing and additives in our food are responsible for so many health and dietary issues and disorders.

When I was a kid in the 1970s, maybe one person in school (say 1%) had a food allergy or intolerance, now every second person has one.

Take wheat – a lot of people have difficulties with it today, or believe they do, hence the proliferation of gluten-free products (many of them hideously industrially processed) and gluten-free baking blogs and books. I ardently believe, however, that for most people (not all) the problem is more likely to be with the industrial “food” product and the ingredients, not with the grain itself. Human civilisation was largely built on wheat, at least in the Middle East and Europe.

If you eat a sandwich made of white sliced “bread” you may well feel bloated and sick; if you eat a sandwich made with real bread – made from just wheat, water,  salt and yeast (better yet, sourdough) and fermented for at least five hours, preferably more – you may not have the same reaction. I stopped  eating sliced industrial “bread” because it made me feel ill. This is what got me more interested in making real – really digestible, really nutritious – bread.

Humanity developed the skill of converting wheat into a nutritous foodstuff by giving it a long fermentation: a form of processing. And not packing the bread with additives. Sliced industrial “bread” may only be fermented for 20 minutes and is packed with additives. Is it any wonder modern “food” is making people ill when we so readily reject knowledge garnered and honed over millennia in favour of hubristic chemistry experiments?

8 Comments

Filed under Baking

Justin Gellatly almond cake

Gellatly almond cake slice

This is my first recipe from the book Bread, Cake, Doughnut, Pudding by Justin Gellatly, formerly of St John now of Bread Ahead bakery, London. It’s a book I needed on my shelf, really, given the overlap with my area of interest – and the name of this blog. So thanks Rachel for the gift.

Gellatly lists this as Swiss almond cake, but I can’t quite bring myself to do that. Thing is, I’m sure this is a version of toscakaka – a Swedish almond cake (here’s a version on Poires au Chocolat). Either way, it’s delicious. A huge, almondy beast with an absurdly rich, crunchy, buttery almond topping. As with the classic toscakaka, you partially bake the batter, then add the topping, then continue baking.

Topping mix
200g butter
200g caster sugar
4 tbsp milk (full fat)
40g plain flour
50g ground almonds
200g flaked almonds

Cake mix
200g unsalted butter
260g caster sugar
400g plain flour (I use Stoate & Sons stoneground, which isn’t that pale bleached colour of more mainstream flours)
1 tsp baking powder
100g double cream
1 1/2 tsp almond extract or essence*

1. Grease and line the base and sides of a 26cm springform cake tin.
2. Preheat the oven to 160C.
3. Make the topping mix by gently heating together the butter and sugar in a saucepan. When melted, add the milk, flour, ground almonds and flaked almonds and stir to combine. Put aside.
4. Make the cake batter, starting with melting the butter.
5. In a large bowl, beat together the eggs and caster sugar until the colour lightens and the mix is airy. (I reduced the sugar from 300g to 260g and it was still very sweet!)
6. Beat in the melted butter, then the cream and essence (or extract!).
7. Sieve together the flour and baking powder then fold this into the batter.
8. Pour the batter into the cake tin, then bake for 25 minutes.
9. Carefully take the cake out of the oven, and gently spread the topping on.
10. Increase the heat of the oven to 180C then put the cake back in and bake for another 40 or so minutes. It’s tricky to judge when this cake is done, as the skewer may come out of the cake itself clean, but the topping will still be smeary. You want the topping itself to be browned nicely.
11. Cool in the tin for 20 minutes then remove and either serve warm with cream or whatever you fancy, or allow it to cool completely.

Gellatly almond cake

Oh, and you might want to invite friends over to help you as it is substantial. The best bit is the edge of the topping where it’s caramellized against the tin. Good stuff, thank you Mr Gellalty.

Gellatly almond cake side

* I’m not going to try and explain the difference here, just use what you have – preferably a natural not synthetic product)

2 Comments

Filed under Baking, Cakes

Shrove Tuesday Scandinavian cardamom buns: fastelavnsbolle or semlor

Semlor, semla, fastelavnsbolle

I’ve never been to a Scandinavian country, but that doesn’t stop me enjoying their baked goods from afar.

I’ve had my eye on these cardamom flavoured buns filled with almond paste and cream for a while, but as the Christian Shrovetide, the three days before the pre-Easter fast of Lent, only comes round once a year, now’s my chance to make them. Yes, yes, I know I made some seriously sugary carby Italian Carnival treats yesterday, but it’s a busy time of year for indulgent foods. Indeed, Shrovetide is all about the indulgent foods, even giving Christmas a run for its money.

In Britain, the remnants of this tradition are our pancakes, with the secular name for Shrove Tuesday Pancake Day*. We used to have a tradition to eat slices of bacon – collops – on the Monday before Lent, but this seems to be all-but forgotten now. It’s all about the fatty, rich foods though, as commemorated in the more common international name for Shrove Tuesday: Mardi Gras, Fat Tuesday, Fettisdag in Swedish. The Danish and Norwegian name, meanwhile, is Fastelavn, which comes from older German and means “fast-evening”.

Versions of these buns are eaten throughout Scandinavia and adjacent areas, and go under various names: according to Wikipedia these are “semla or fastlagsbulle (Swedish), laskiaispulla (Finnish), vastlakukkel (Estonian) or fastelavnsbolle (Danish and Norwegian)”, with semlor the plural of semla, from semila, the Latin for flour (and related to the English and Italian grain-related words semolina, semolino, semola). Another Swedish name is fettisdagsbullar. So either “Fast-evening buns” or “Fat Tuesday buns”.

A common version of the bun these days involves filling it with almond paste and whipped cream. The almond paste form was first recorded in 1883, the cream supposedly came as a ration-busting celebration in Sweden after the First World War. In our modern world of more-is-more, both are combined.

Eaten without a filling, and instead sprinkled with cinnamon and served in a bowl of warm milk, they’re known as hetvägg. King Adolf Fredrik of Sweden purportedly died in 1771 after eating 14 but that may be one of those myths perpetuated by the internet. Not reading Swedish, I can’t confirm or deny it.

Almond paste

It’s very easy to make almond paste, marzipan or mandelmassa, but if you are intimidated it’s easy to buy too.

175g ground almonds
175g icing sugar (aka confectioner’s sugar, powdered sugar)
1 egg

1. Beat the egg slightly and combine with the ground almonds in a bowl.
2. Add half the sugar and bring together – either with a spatula or wooden spoon or by getting your hands in there – and form a sticky dough.
3. Sieve the rest of the icing sugar onto your work surface then turn out the dough, and bring together, incorporating the sugar.
4. Wrap in plastic and leave in your fridge until it’s needed. (Well-wrapped, homemade marzipan will last for a few weeks in the fridge.)

Dough and buns
1 tsp cardamom
75g butter, melted
300g milk
20g fresh yeast (or 12g ADY or 10g instant)
500g plain/all-purpose flour
1 medium egg, lightly beaten
50g caster sugar
5g fine salt

Semlor ingredients

1 extra egg, for glazing

Ground cardamom

1. Crack open a few green cardamom pods and grind the seeds to a powder in a pestle or mortar or spice grinder.
2. Combine the melted butter and milk, warmed to about body temperature.
3. Add the yeast to the milk and allow to sit and activate for a few minutes.
4. Put most of the flour, the sugar, the salt, the cardamom and the egg in a mixing bowl, then add the yeasty milk mix.

Dough, mixingDough, sticky
5. Stir to combine and bring together the dough. It will be pretty moist. (Say your beaten egg weighs 58g, along with the milk and melted butter that’s 433g of liquid, to 500g flour – ie about 87% hydration, though the butter will firm up somewhat.)
6. Put the rest of the flour on your work surface and turn out the dough. Bring it together and knead, trying not to add too much more flour – you want to keep it nice and moist, so the resulting crumb is light.
7. I gave mine a Dan Lepard style knead – that is, brought it together, formed a ball, let it rest, covered in a clean bowl, for 10 minutes then gave it another short knead. Then I repeated this 10 minute rest, short knead process twice more.

Dough close up
8. When you have a nice smooth dough, put it back in a clean bowl, cover, then leave to double in size. This will take an hour or two at room temperature (about 18C).

Dough pre first riseDough after first rise

ScalingForm balls
9. The resulting dough weighs 1kg, more or less. To make 18 medium sized buns, divide this into pieces scaled at 55g. You can go bigger or smaller – up to you!

Forming balls 1Forming balls 2

Forming balls 3Forming balls 3
10. Form these pieces into neat balls. I do mine two at a time, rolling them inside cupped hands. This technique works best if your surface isn’t floury, so the dough sticks just slightly. Even better if your surface is stainless steel or marble. As mine is bamboo, I oil it slightly first, which also works well for wood work surfaces.

Balls, final proveBalls, egg washed
11. Put the balls on lined baking sheets, leaving enough space for them to expand, then give them their final prove, again until about doubled in size.
12. Preheat your oven to 220C (I use an interior thermometer as you can rarely trust the temperature on the knob).

Buns, baked
13. When the buns are proved, brush them with beaten egg then bake for about 12 minutes, until risen and golden.
14. Cool on a wire rack, covered with a clean cloth.

Filling
200g marzipan
Crumbs from the buns
100g milk (QB – you may not need it all)

500ml cream, whipped

Buns, splitBuns, hollowed out

1. When the buns are cool, slice off the tops and scrape out some of the crumb with a fork or even a grapefruit spoon if you have such a thing. (I’ve got the remaining single one from a childhood set.) Put the crumbs in a bowl.

Marzipan, grated
2. Finely grate the marzipan then add to the crumbs.

Making the almond fillingMaking the almond filling 2
3. Add enough milk to form a thick paste by squishing it all together with a fork or spoon.

Buns, hollowed out 2Buns, filled
4. Put a blob of the paste in the cavities inside the buns.

All creamed
5. Pipe a layer of the cream on top of the paste, then put the lid back on. I only had a 250ml pot of cream, some of which I’d already eaten with another cake, so it’ll be much better with the 500ml I mention here. Shoddy. Sorry. But I wanted to get this post done today rather than rush off to the shop again.

To serve
Dust with icing sugar.
Enjoy. But don’t try eating 14.

Semlor, semla, fastelavnsbolle close-up

Personally, I’m not too fussed about calories and all that. As well as using the default human form of transport (brisk walking) or cycling when many modern slobs use their car, I also have a general principle that diet is about balance. So obviously I don’t just eat the stuff I write about on this blog. My weight naturally seems to wander about between 80 and 85kg. That said, during out building work last year, when we didn’t have a kitchen and I couldn’t bake, I was 80kg; now I’m 85kg. Methinks a few more brisk walks up our local hill are in order. Or some Lenten fasting. Hm.

13 Comments

Filed under Baking, Feasts, Recipes

Barm brack for St Brigid’s Day, or Imbolc

Barmbrack

Also called barmbrack, barnbreak, bairín breac or bairínbreac, this is the Irish cousin of the Welsh bara brith, with both names meaning “speckled bread” – bread dotted with speckles of dried fruit.

It’s traditionally eaten on Halloween as well as on 1 February, the feast day of one of Ireland’s patron saints: Brigid or Brigit of Kaldare.* This is one of those Christian feast days, in combination with Candlemas on 2 February, that was a rebranding of an older, pagan festival: Imbolc, the mid-point between winter and spring equinoxes. Indeed, although Brigid was nominally a historical figure who lived in the 5th-6th centuries, there was also an older, Irish, or Celtic goddess of the same name and the feast effectively amalgamates the two.

It’s not a big feast day for us Brits, but as Fran and myself both have Irish great-grandparents, it’s a good excuse to try a recipe.

Barm brack is one of the breads that originally would have been made with yeast from brewing, but these days you can either make a yeasted version, ie more an enriched bread, or a chemically leavened one, ie more a fruit cake. Several months ago I accidentally bought an 8kg sack of self-raising flour, so as much as I like yeasted breads, I made the latter, as part of my efforts to use it up.

If it’s not St Brigid’s Day or Imbolc or Halloween, don’t worry – you can still make this brack, and just call it a tea brack, a relative of the other similar baked goods known as tea breads in English.

Oh, and while researching recipes, I found some that were adamant you had to bake in a round tin, some that were free-form (yeasted) loaves, though the consensus seems to be to bake in a loaf tin, which makes sense as you can then slice it and spread it with butter and eat it for afternoon tea.

250g dried fruit – currants, raisins, sultanas or a mixture
300g black tea. We used Earl Grey for that citrus tang from the bergamot
1 medium egg
50g butter, melted
140g sugar, soft brown
270g self-raising flour, or 260g plain/all-purpose flour sifted together with 2 tsp baking powder
Some spice, to taste
Pinch salt
50g candied peel

1. Put the currants/raisins/sultanas in a bowl and pour over the hot tea. Leave it for a few hours, or overnight, so the fruit plumps up a bit.
2. Preheat the oven to 180C, or 160 if you have a fan. That said, my fan oven is pretty puny, so 170C seemed OK. Basically, a medium oven.
3. Grease and line a 900g/2lb loaf tin.
4. Put the flour in a large bowl, add a bit of spice if you like (I used cinnamon, a few grates of nutmeg and a pinch of black pepper, which is probably unconventional, but seemed appropriate) and the salt.
5. Add the sugar. I used soft brown and a bit of dark muscovado that was hanging around.
6. Add all the rest of the ingredients, and stir to combine. The resulting batter will be pretty sloppy.
7. Pour into the tin and bake for about one and a quarter hours, turning down the heat slightly and covering the loaf with foil if the top is browning too much.
8. When it comes out of the oven, you can brush it with a simple sugar syrup made from a few tablespoons of water and a few of sugar, dissolved then boiled quickly.
9. Turn out, allow to cool and serve.

Funny, I never much liked fruit breads and cakes, but I’m increasingly enjoying them, and this was lovely. We ate several slices, sitting around with our friend Liv, drinking gallons of tea. I was tempted to open an ale, as one source I read insists you have it with ale; which would make sense, but only a rich, malty ale, without too much newfangled hoppiness.

I’ll make a yeasted version come Halloween, but we’ve got spring and summer first, so I’m not wishing the year away on this cold late winter day.

Barmbrack 2

* Her name is also spelled Bride, and some suggest Saint Bride’s Well, and Bridewell Palace (mostly destroyed in the Great Fire of London) and St Bride’s Church in the City of London take their name from her too, possibly via Irish monks who came to England to convert the heathens.

7 Comments

Filed under Baking, Breads, Cakes, Feasts, Recipes

Sticky toffee pudding, two recipes

Sticky toffee pudding, vanilla ice-cream

The past three weekends I’ve done sticky toffee pudding for Sunday lunch. This is in part because it’s a delicious pudding, but also because, well, January is a horrible time of year in Britain: Christmas festivities are behind you, it’s cold, it’s dark, it’s dank. If there’s a time of the year when you can justify indulging in sweet stodge, it’s now, you need that carb comfort. Save your de-toxes and dietary self-deprivation for a nice time of the year – May or June say, when there’s new life, new growth, longer days, more light.

Sticky toffee pudding is usually made by baking a batter, which gets its character from the inclusion of dates that have been soaked in boiling water, with a toffee sauce poured over the finished cake. The past few weeks I tried Felicity Cloake’s recipe, which is great, but not perfect (there’s not enough sauce for starters) then my own baked version (below). But it got me thinking, what about a steamed version?

I grew up eating treacle sponge pudding, a steamed pudding where you put golden syrup into a pudding basin, then cover it with a batter and steam it. The result is genuinely sticky, and lovely, and a must in winter. I wanted to try the same with sticky toffee, putting some of the sauce into the basin before cooking to give a similar result.

Steaming is an old-fashioned way of cooking puddings that’s not that common now. It takes longer than baking, so make sure you check the timing of your meal as it’s always nice to serve a steamed pudding straight away, turned out and freshly oozing and steaming. When I made this on Sunday, to accompany a bonanza of pork smoked by Fran and her brother Al, I failed miserably with this as we were playing in the park and I left it too late. This one is made in a 1.2 litre pudding basin, so it takes a while for the heat to cook the batter all the way through: mine took four hours.

This sort of cooking is especially good if you have a range cooker or woodburner, where a pan can just steam away quietly with no extra energy demand. We’ve got an induction hob now, which is very energy efficient, so steaming is a good choice. On more conventional cookers, too, it’s no so bad, as it only requires a low flame.

Sauce
300g cream
100g caster sugar
100g dark muscovado sugar
100g butter

Batter
240g stoned dates, chopped
250g boiling water
1 teaspoon / 7g bicarbonate of soda

175g butter, softened
80g caster sugar
80g dark muscovado sugar
3 medium eggs, beaten
175g self-raising flour [or 170g of plain/all-purpose flour and 1 1/2 tsp baking powder*]
1 tsp vanilla extract
Grate of lemon zest

1. Grease a 1.2 litre pudding basin.
2. Put the dates and bicarb in a bowl, pour over the boiling water and leave to soak for at least 10 minutes.
3. Make the sauce by combining the cream, butter and sugars in a saucepan and heating slowly on the hob. When all melted, increase the heat to a boil and cook for 5 minutes.
4. Put about 4 tablespoonfuls of the sauce in the base of the basin and leave the rest in the pan for serving.

Cream butter and sugars

5. Make the batter by creaming together the butter and sugars until light.
6. Add the beaten egg, along with the vanilla and lemon zest, a little at a time. Add a little of the flour if it starts to curdle.
7. Sieve in the rest of the flour and fold it through.

Add the dates

8. Pour all the date gloop into the batter and blend. It’s not the nicest looking batter, but don’t worry, it’ll taste great.
9. Put this batter into the basin.

Seal the basin

10. Cover the basin with a piece of foil or parchment, with a pleat in it, and tie a piece of string around the rim, to secure.
11. To steam the pudding, I just use a vegetable steamer set over a pan over simmering water, but you can also use a large pan, with a heatproof plate set in the bottom, and filled with water to half-way up the pudding basin.
12. Steam for about 3 1/2 hours. If it’s not cooked through it can collapse, ruining your ta-da! moment, so take the basin out of the steamer, remove the string and check the mixture. You should be able to see very clearly if the batter hasn’t quite turned into sponge pudding yet. If it hasn’t reseal the foil and continue to steam.
13. When the pudding is almost cooked, warm up the sauce again.
14. Turn the pudding out onto a warmed plate, and serve immediately. Either pour the sauce over the pudding before cutting it, or pour the sauce over individual wedges. For added decadence, add a blob of whipped cream, clotted cream or vanilla ice-cream.

Invert the basin

Remove the basin

Sticky toffee pudding - drizzle with sauce 1

Sticky toffee pudding - drizzle with sauce 2

Sticky toffee pudding - drizzle with sauce 3

The result is good. It’s considerably more sticky than a normal, baked sticky toffee pudding, which relies on the sauce for any stickiness. This is sticky all the way through, it’s denser, gooey, oozey. I’m not saying it’s better, it’s just suprisingly different considering how the flavours are the same: it’s just a question of texture.

Baked version

Make them both, compare, enjoy the sugary, stodgy winter foods!

Batter
240g stoned dates, chopped
250g boiling water
1 teaspoon / 7g bicarbonate of soda

120g butter, softened
80g caster sugar
80g dark muscovado sugar
4 eggs, beaten
1 t vanilla essence
Grate of lemon zest
240g SR flour

Sauce
300g cream
100g caster sugar
100g dark muscovado sugar
100g butter

1. Preheat the oven to 180C.
3. Put the dates and bicarb in a bowl, pour over the boiling water and leave to soak for at least 10 minutes.
3. Cream the butter and sugars, then add the beaten egg, along with the vanilla and lemon zest, a little at a time. Add a little of the flour if it starts to curdle.
4. Sieve in the rest of the flour and fold to it through.
5. Pour all the date gloop into the batter and blend.
6. Put the sloppy batter in a 22cm-ish square tin lined with parchment and bake for about 50 minutes or until risen and firm and a skewer comes out clean. If it’s starting to brown too much but not baked through, cover with foil and leave in the oven some more.
7. Meanwhile make the sauce by combining all the ingredients in a saucepan, heating them to melt. When all melted together, bring to the boil and cook for about 5 minutes.
8. When the cake part is baked through, remove from the oven.
9. Serve the cake warm, cut into chunks, with the sauce poured over and a blob of thick cream, ideally clotted cream, or with vanilla ice cream.

Enjoy!

Oh, and for any North Americans struggling with my British English use of the word “pudding”, check out this post.

* Converting plain/all-purpose flour to self-raising involves replacing 5% of the flour with baking powder. I wrote a whole post on it here. As 5% of 175g is 8.75g, which is a bit awkward. So as a teaspoon is 5 ml, or effectively 5g of powder, let’s just call it 1 1/2 teaspoons (sure, that’s closer to 7.5g, but it’ll be fine when steamed. If you’re fussed, just heap up your teaspoon a bit).

20 Comments

Filed under Baking, Puddings & desserts, Recipes

Sussex wassail apple cake

Sompting wassail cake
We live in a somewhat charmless 1950s-1960s neighbourhood, but we have a decent-sized garden and are close to some beautiful countryside. That garden contains, among other things, two old apple trees. A neighbour who’s lived here since the estate was built says much of it was an orchard beforehand. So those veteran apple trees, gnarled and neglected, deserve some respect as survivors.

One way we in southern Britain, particularly the southwest and southeast of England, traditionally paid our respects to our apple trees was by wassailing. To wassail is to salute, to wish good health, with the ail part of this Old English/Old Norse word equivalent to the modern English hale, as in “hale and hearty”, whole and in good health.

The word also refers to a drink drunk when wassailing, from a wooden “wassail bowl”. I must admit I didn’t make the drink this time, as the recipes I found on this fascinating site are types of punch-like concoction involving mulled cider, mulled ale, mulled cider and ale mixed, mulled cider and ale and fortified wine mixed, all often also mixed with whipped egg and garnished with toast. For toasting your apple trees, your neighbours, your community, in the hope of winning over apple tree spirits and guaranteeing a good harvest – and plenty more cider the following year. As a teenager I drank far too much snakebite – half-half beer and cider – and it made me so sick it put me off alcohol for years. So although I love tradition, I’m wary of cider-ale combinations.

Wassailing is traditionally carried out on Twelfth Night – that is, 5 January, the night before Epiphany. However, there’s also a tradition that favours Old Twelvey Night – the night of 17 January, the eve of the Epiphany according to the Julian calendar, which was replaced by the Gregorian calendar for most Westerners and Christians in 1582. This is – or was – favoured in the southwest of England, where Fran’s from, and my mother’s mother was from.

Anyway, after a few ciders – both local and from Normandy, another gift from some family friends – Fran and my mother, Helen, started singing a wassailing song, that goes (oddly, considering most the trees are bare of leaves):

“Here we come a-wassailing
Among the leaves so green;
Here we come a-wand’ring
So fair to be seen.”

The song is probably Victorian. Indeed, although these traditions may well be ancient, possibly with pre-Christian origins, as we so much British folk culture, the form we know today was likely largely shaped by the Victorians.

While they tried to remember the song, I made an apple cake. This recipe is from Sompting, a Sussex village about 16 miles (25km) away from where we live in Lewes. The original recipe makes for a fairly substantial foot-square cake, a little large for my family gathering.

The woman who provided the recipe, one Marjorie Clarke said of the cake tin, “We use a special one with a hole in the base, so that the cake can be carried on the end of a spear in the procession.” That’s probably not the sort of cooking kit you have. I certainly don’t, and don’t really fancy drilling a hole in one of my tins. So I think a standard square, or similarly proportioned rectangular one should do. I reduced the quantities and tweaked it slightly. Then burned the top a bit in my new oven. But no matter, that felt suitably rustic and the cake was lovely and moist, the raisins fattened with very natural Wobblegate Sussex Scrumpy I used.

Local ingredients

225g eating apples
110g raisins
225g cider
170g butter
100g (4 tbsp) honey
4 medium eggs (approx 190g egg white & yolk)
200g self-raising flour
2 tsp baking powder

1. Grease and line an 18cm square baking tin, or similar.
2. Preheat the oven to 180C.
3. Put the raisins in a saucepan, cover with the cider, bring to the boil then remove from the heat.
Apple, raisins, cider
4. Add the apple pieces to the cider and raisins, and allow to cool while you continue.
5. Cream the butter and honey then gradually add the beaten egg. If it starts to curdle, add a little of the flour.
6. Sieve together the flour and baking powder.
7. Add half the flour to the batter, and combine.
8. Add half the cider mixture to the batter, and combine.
9. Add the other half of the flour and fold in.
10. Add the rest of the cider mix and carefully combine, until the mixture is uniformly mixed, but not over-mixed.
11. Pour the mix into the tin.
12. Bake for about an hour, or until risen and firm.

We didn’t visit neighbours and sing to them and their apple trees. Instead we stayed indoors and ate cake and raised our glasses of cider in the direction of our apple trees – the old ones augmented by a crabapple I planted last year and a dwarf apple I planted three years ago, which was a wedding present from my cousin and her husband. Here’s to a good fruit-bearing year! Wassail!*


* Yes, I know I should have posted this on Saturday, but there’s always next year.

5 Comments

Filed under Baking, Cakes, Feasts, Recipes

Puff pastry, three recipes compared

Dan Lepard puff pastry baked

The past week or so I’ve been playing around with puff pastry. The first recipe I made was from Ginette Mathiot’s The Art of French Baking. I used this for my galette des rois Epiphany tart, but wasn’t entirely satisfied with it, so I started reading up and decided to compare some different recipes.

I’ve made puff pastry in the past, but like most home cooks I’ll either do rough puff or just buy ready-made. It always just seemed a bit of a faff to do at home, especially after I’d done it at college on a pastry break, aka dough sheeter, aka laminating table – a kind of conveyor belt with adjustable rollers that makes it so much easier and quicker to make laminated dough or pastry.

That’s what puff pastry is – it’s laminated, it consists of layers, lots of layers. Although croissants or cornetti are also laminated, they use a yeasted dough. Puff pastry doesn’t contain any leaven or raising agent, and lift mostly relies on the lamination, with layers of butter trapped between layers of a simple dough. When it’s baked, the water in the mixture turns to steam, tries to expand and pushes upwards. The fat layers trap it, opening up the product.

In French, classic puff pastry is called pâte feuilletée*. The whole art of making it and using it is called feuilletage, which can also be translated as lamination. The basic technique involves creating a simple paste that’s predomiantly flour and water, called the détrempe, and laminating into it butter (or other fat), called the beurrage.

Puff pastry/Pâte feuilletée from The Art of French Baking by Ginette Mathiot

This book was originally published in 1932. If you look at older recipe books, there’s often quite a lot assumed on the part of the writer and the recipe can seem cursory to modern readers. Such is the case here, when you compare it to books – or indeed blogs – with lots of helpful pics.

200g plain flour
Pinch of salt
100g ice cold water
100g butter, diced and softened

GM1

1. Sieve the flour and salt into a bowl and add most of the water to create “a smooth, elastic dough adding the rest of the water if necessary.”

GM3
2. On a lightly floured work surface, roll it out. She says 15mm thick, which seems a bit thick considering the quantities. She doesn’t give any guidelines for how big a sheet of pastry you’re aiming for.

GM4
3. Add the butter to middle of the sheet “and fold over the flour corners” to enclose.

GM6
4. Wrap and chill for 10 minutes in the fridge.
5. Roll out again, this time to a “long rectangle 5mm thick”.

GM7
GM8
GM9

6. “Fold the short ends to overlap in the centre, like a business letter, to make a smaller rectangle with 3 layers.”
7. Chill 15 minutes.
8. Roll out again and repeat.
9. Chill 15 minutes and “Do this six more times”, this is called six more turns.
10. “After the sixth turn the pastry is ready but the more turns you do, the more layers the pastry will have.”

This is the most basic recipe in terms of a straight détrempe and beurrage. I found it didn’t puff up that well but that may have been partly to do with my learning curve, as you can see from the pics this wasn’t the most refined batch. I did it again, more neatly but it still didn’t puff up that well, though it made for some delicious sausage rolls.

Sausage rolls

All-butter English puff pastry from Short & Sweet by Dan Lepard

Short & Sweet collects Dan Lepard’s essential recipes from his run in The Guardian. You can find a version of this recipe here, though I highly recommend the book, which includes a tweaked version containing egg.

Dan L writes “this recipe is based on an old English method from the late 1800s that varies from the French puff pastry recipes from that era, in that it adds more of the butter when mixing to the dough.” He says this makes it easier to roll, and “very delicate and tender” once baked. What interested me here was a Britain-based Australian baker doing an old English recipe from probably only a few decades before the French Mathiot recipe.

Dan L puff 1

275g plain flour
275g strong white flour
1 tsp fine salt
550g butter, “cold but pliable”
2 tsp lemon juice
1 egg yolk
175g cold water

Dan L puff 2
Dan L puff 3

1. Sieve the flour and salt into a bowl and add 125g of the butter, cut into small pieces and rub in fully.
2. Beat together the water, lemon juice and egg yolk then add this to the flour and “knead to form a consistent dough.”
3. Wrap and chill for 30 minutes.
4. Roll out to about 50x30cm.
5. Slice the butter and lay this over two-thirds of the dough. Fold down the unbuttered third, then fold up the buttered third at the opposite end. So you are doing a single book fold again, just adding the butter in a different fashion.
6. Roll the top slightly to press out any air bubbles.
7. “Seal the edges with a sharp thwack of the pin” then wrap and chill for 30 minutes.
8. Roll out again to 60x20cm and fold the thirds again, so the parcel is about 20x20cm
9. Cover and chill again.
10. Roll out again, repeat. Chill, repeat – giving four more “turns”, resting between each.

As with so many Dan Lepard recipes, this one just works. There’s enough detail to explain, but not so much you get boggled. I used some to make a pie (main pic, above) and it puffed wonderfully.

Feuilletage Jean Millet from The Roux Brothers on Patisserie

The essential text The Roux Brothers on Patisserie was published in 1986, reprinted in 1991 and given to me as a Christmas present by my parents in 1995. I’ve enjoyed a lot of challenges from it over the years, and plenty of delicious results. I’d not tried their puff before though. They credit it to “our friend Jean Millet, the president of the Confédération de la Pâtisserie, Confiserie, Glacerie de France and MOF in patisserie,” which isn’t intimidating at all.

500g flour
200g water
12g / 1.5 tsp salt
25g white wine vinegar
50g butter, melted
400g butter, well chilled

Roux 1

1. They combine the liquid into the flour working it on a work surface. I just used a bowl – flour, salt, then add the water, vinegar and the butter (which I allowed to cool a bit after melting). “When all the ingredients are well mixed, work the dough with the palm of your hand until it is completely homogenous, but not too firm.”

Roux 2
2. Form a ball and cut a cross in the top.
3. Wrap and chill for 2-3 hours.

Roux 3
4. On a lightly floured surface, roll out – extending the quarters formed by the cut to create four ears, with a small mound in the middle.

Roux 5
5. Put the chilled butter between two sheets of parchment or plastic and hit with the pin, “so that it is supple but still firm and very cold.”

Roux 6
6. Place the flattened butter in the middle of the dough then fold over the ears to enclose it.Roux 8
7. Wrap and chill for 30 minutes “to bring the butter and dough to the same temperature.”

Roux 9
8. Roll out to about 70x40cm. “Fold over the ends to make 3 layers. This is the first turn.” Ie, you’re doing another single book fold.
9. Roll out and fold again. “This is the second turn.”
10. Wrap and chill 30 minutes.
12. “Make 2 more turns” then rest for 30 minutes to hour in the fridge.
13. “Make 2 more turns bring the total to 6.”

This worked well too. As with Dan L’s, you incorporate some of the fat into the détrempe, making it easier to handle. As with Dan L’s it also makes quite a lot – about 1.2kg. So you can cut it into portions and freeze them.

Roux 10

This is the batch I used to make my pithivier. I’ll include this pic again, as it show very clearly some great puffing action.

Baked, sugar, side

Observations and tips

Flour – Mathiot stipulates plain flour (equivalent to all-purpose in the US), while Dan L uses a mixture of plain and strong, and the Roux brothers don’t specify. My old teacher said to use all strong flour. Stron (higher protein) flour is more resilient to all the manhandling and manipulation involved and will also give more lift in the oven. Plain (lower protein) flour will give a shorter texture, so will aid the melt-in-the-mouth quality. Always one to try and find an amenable middle ground, I’d recommend Dan L’s half-half approach.

Fat – proper puff pastry needs butter. This can be problematic for people on certain diets, but personally I don’t want to eat “pastry fat” – which is made from hydrogenated vegetable oils. The body simply cannot metabolise hydrogenated fats. Plus, butter simply tastes better, and doesn’t leave the iffy dry mouth-feel of some more processed fats.

Always make sure the fat you’re using is at a similar temperate to the paste, the détrempe. This means cold but pliable. As for the type of butter, Dan L says “You get the lightest pastry using a butter with a low moisture content, like Lurpak or Président” (ie Danish or French) but as I prefer to use local produce, I wanted to at least use English butter; Yeo Valley organic seemed to work well too. Oh, and generally unsalted makes most sense, as it’s more versatile for sweet or savoury products.

Combining – cutting the cross and making the ears is known as the French method. Slicing up the butter and laying it on two thirds of the rectangle is known as the English method. I found it easiest to handle the butter, and start the folding, when it was beaten with the rolling pin, as opposed to cubed or sliced, which seemed more likely to cause breaches. So when I tried Dan L’s I smeared the slices a bit to take off any sharp edges.

Acid – as these three recipes have shown, some call for lemon juice, others vinegar, while Mathiot’s contains neither. My online travels showed me that Richard Bertinet, Anna Olsen and Joe Pastry, among others, include lemon juice. Paul Hollywood doesn’t include any acid. The only explanation of the acid I can find is that helps prevent the pastry from oxidising and turning grey and helps tenderize it. In my case, I tend to use stoneground flours, rather than shiny bleached flours, so my doughs are always off-white anyway. Once baked, I don’t think it makes much difference with pastry, especially if you glaze it.

Resting and temperature – you have to rest the dough when you handle it a lot. This is for two reasons. Firstly, you don’t want to melt the butter or it’ll just blend with the paste, destroying the layers, so it’s always best to keep it below about 16C. Secondly, if you overwork the paste or dough, it’ll toughen up; resting it allows the gluten to relax and stay pliable. Resting times really seem to vary in these recipes, but I found Mathiot’s too short and more than 30 minutes potentially tricky, as if you fridge is at 4C, it’ll get too cold, reducing that pliability again, meaning you’ll probably need to let it warm up again before pinning it out. If it’s too cold, the butter can break through the layers of paste. That said, you may need to leave it in the fridge longer to fit in with your other commitments!

Folds and turns – when you roll it out and fold it up, that’s a turn. There are different techniques. I just stuck with the technique of folding the rectangle in thirds. You can also quarter the rectangle, folding both ends in towards the centre, then folding again in the centre, as if it’s the spine of a book. This immediately creates more layers. There seems to be some confusion over the names of these techqniques. Some call the former a half-turn or single book turn, while others called the latter a book turn or a double book turn. I’m not going to try and authoritatively name either.

Pinning out – when you pin it out, make sure you have the open ends of the parcel in the direction you’re rolling. Try to keep your piece of pastry in a rectangular shape, with straight-ish edges and square-ish corners. This takes a little practice, you can straighten up the edges with your rolling pin and stretch or pin out the corners. Also, when you fold it, take care with any air bubbles. You can press these out, or even jab then with the point of a knife, though this isn’t ideal. You’re trying to build up consistent layers.

Using it – it keeps well in the freezer, or for up to about 3 days in the fridge. When you’re using it for pastries, or pies, or tarts, it always benefits from being washed with whole egg or yolk, but when you do try to avoid any edges or it’ll seal them up and stop it rising and puffing nicely. Before baking, let it rest again, for more than 20 minutes and even overnight, as this will prevent it from  distorting when it’s put in the oven. Dan L even freezes his again before using, once it’s pinned out. Bake it at a hot temperature, 200C plus.

Conclusion
Unless you’re some kind of pastry purist, I’d recommend a recipe that incorporates a bit of the total fat into the détrempe. I’ve even seen recipes that incorporate a bit of the flour into the beurrage but I’m not sure that’s really necessary. I’d also recommend the recipes with a higher fat: flour ratio. The Mathiot recipe seems a bit meagre and modest with, in baker’s percentages 100% flour to 50% fat, when the Dan L is 100% fat and the Roux-Millet is 90% fat. Technically the Mathiot can be called a “half-puff” while Dan L’s is “full-puff”. As many chefs will tell you, fat is flavour, and good butter is delicious, never mind how it helps give that wonderful flaky, delicate, melty texture to the pastry.

I realise this is probably the longest post on this blog, but I hope a few get to the end and find it useful. I haven’t got into any maths [l = (f + 1)n] or mentioned the “Dutch or Scottish method”, but maybe I’ll talk about that in another post on rough puffs at some stage.

Baked crumbly puff pastry


* The French word pâte is related to the English words paste and pastry and the Italian words pasta, impasto, pastella etc, and they all come from the Greek for stewed barley, via the Latin. Feuille means leaf or sheet, and like the English folio or Italian foglia and foglio comes from the Latin.

13 Comments

Filed under Baking, Pastry, Recipes

A Pithivier

Baked, sugar, side

In my last post about galette des rois, I mentioned that this French Epiphany pie is basically a form of Pithivier. These are puff pastry pies that may well originate in the town of Pithiviers in central France. Indeed, in French the pies are known as Pithiviers, but us foreigners lop off the final s. Don’t ask me why.

Unlike the galette des rois with its sweet frangipane filling, Pithiviers can be sweet or savoury. As I had some more frangipane, and have been making a lot of puff pastry lately, I thought I’d make a Pithivier – a sweet one that was basically a mini galette des rois without the requirement for it to be eaten on a feast day.

I also wasn’t happy with how I’d bodged the edge of my galettes des rois, crimping it like a pasty rather than leaving it free to expand. So I was determined to finish this one more neatly.

Traditionally both the galette des rois and Pithiviers have a kind of scalloped edge, like the petals of flower petals. This can be achieved by using a semi-circular cutting edge, for larger scallops, or by simply cutting into the edge slightly with the blade of a knife, or indeed the back of the blade of a knife, which is what I did.

So, as with the galettes des rois, I rolled out some puff pastry (about 300g in this case), and cut two discs (in this case I used a 16cm diameter side plate). I then put the frangipane in the middle of the bottom disc, leaving a rim of about 25mm, which I brushed with egg wash. I then put the top disc on, and pushed it down firmly to seal.

Pithivier, unbakedPithivier, baked

I then egg-washed the whole thing, scalloped the edge as described above and cut curved lines in the top, radiating out from the centre. I baked it at 200C for about 25 minutes. After baking, I dusted it with icing sugar and put it under a hot grill to caramelise slightly (top pic, above).

In this case, the edge puffed up very satisfactorily.

Baked, side

My next post will be all about my puff pastry experiments. I’ve been obsessing slightly as you may be able to tell if you follow my Instagram


5 Comments

Filed under Baking, Pastry, Pies & tarts

Galette des rois and celebrating the end of Christmas with Epiphany

Crowned galette des rois

I love the Christmas season, but one thing I loathe about its modern British incarnation is how it begins in the middle of October. People start stressing, hurry to put up their trees at the start of December, then run out of steam by about Boxing Day, with some even taking down their decorations. Yet Boxing Day, the 26th, is only the Second Day of Christmas.1

We all know the song that starts “On the first day of Christmas my true love gave to me…” but miss the significance. Formerly, Christmas was celebrated from Christmas Eve and Christmas Day itself, when the feasting started and was sustained until Twelfth Night, 5 January, the eve of Epiphany. This ending of the season on 6 January is still celebrated in some cultures with king cakes, or kings cake. The kings in question? Why that would be the Three Kings, the Magi.

This is all perhaps a bit confusing for those who grew up with formalised Nativity plays and scenes that pack in the whole cast of characters – holy family, kings, shepherds, sheep, oxen, camels – for the actual birth of Christ. But alternative names for Epiphany are Three Kings Day, or simply the Day of the Kings, as it’s when they arrive at the famed Bethlehem farm outbuilding and give their gifts. Indeed, some cultures still do their main gift-giving on Epiphany. It’s an important Christian feast day, hence the feast foods: the king cakes.

The end of Christmas
Not only are variations on king cakes served on Epiphany, they can be served repeatedly through Carnival season right up until Lent, with the New Orleans version, for example, being essential for Mardi Gras, Fat Tuesday.

The northern French king cake – galette des rois – isn’t the richest concoction, but I still love how this tradition is one in the eye for all the hackneyed dogma that gets trotted out with the British New Year celebrations about how you have to stop indulging and embrace self-denial. Indeed, one of the things I loved during our two years living in Rome was how Carnevale brought with it uniquely indulgent seasonal sweets soon after New Year.

Before our time in Italy, the biggest connection to another European country and culture in our household came with Fran’s Francophilia. She’d made a connection with France when she was young, studied French, and spent several years living in Brittany and Paris when she was in her late teens and twenties. It was Fran who first told me about the galette des rois five years ago.

While southern French, parts of the US South and some Spanish and Latin cultures do a more cake-like king cake made with enriched dough, and decorated with coloured icings and candied fruits2, the northern French galette des rois is a more modest concoction. It’s a sweet pie, made with puff pastry (pâtes feuilletées) and filled with almond paste, frangipane; essentially a pithivier.

Slice

Cake, round and flat
What is a galette? Well, it’s defined as an “espèce de gâteau rond et plat” – “a type of cake, round and flat”. From what we can work out, it’s the diminutive of gale, again meaning a round, flat cake but also used to describe a small round stone, worn flat by water3. Alan Davidson says, “the word being derived from galet, a pebble perfect for skipping”. The word is perhaps best known from galettes brettonne, Breton galettes – pancakes made with buckwheat flour found in that region of northwest France. It also refers to certain types of biscuits and cookies, also round and flat.

Charming
Anyway, as well as being a modest treat, the fun thing about galette des rois is the inclusion of a fève – literally a dried bean (like the Italian word fava, broad bean). This is hidden in the frangipane mixture and bestows good luck on the person who finds it in their portion. This is not unlike the old British tradition of hiding a coin in Christmas pudding, and indeed lots of cultures have festive baked goods that include a charm of some form: it’s common to other king cakes, the Bulgarian banitsa contains a kusmeti charm, etc.

The modern form of the fève is a small ceramic or plastic figure of the baby Jesus. Last time I made one, I debated using a Monopoly piece but opted instead for a marble. This time, however, I decided to use something edible, so chose half a walnut. No danger of choking! The French tradition is for the youngest child of the gathering to sit under the table and call our names as the slices are served, for an added layer of chance. Whoever wins the fève gets to wear the paper crown you place on top of the galette des rois when you serve it and be the family king or queen for the rest of the day. Or nominate someone else if they’re not feeling the lure of such absolute authority.

The inclusion of a bean is likely a pre-Christian Roman tradition, when for one day in winter slaves and masters would eat together, and even the slave could be king of the feast, or at least the magister bibendum, “master of the drinks” or toastmaster. As Davidson points out, when the pagan Roman empire was Christianised, it made sense to declare 25 December Christ’s birthday, “co-opting these immensely popular holidays” and midwinter ceremonies, notably Saturnalia.

Recipe
This time round I also made my own puff pastry, using a recipe from the new 2011 translation of Ginette Mathiot’s The Art of French Baking (originally Je Sai Faire La Patisserie, “I Know How to Make Pastries”, 1932). It was okay, not great. Partly it didn’t puff well as I messed up the edge of the galette; that’s a tricky bit, as you need to seal it well to contain the frangipane, but not to the point of preventing any rising and puffing of the pastry. Anyway, most people will probably prefer to just use bought puff pastry – if so, make sure it’s all-butter as the richness and flavour is essential.

400-500g all butter puff pastry

Frangipane filling:
85g ground almonds
85g caster sugar
Pinch salt
85g unsalted butter, softened butter
2 medium eggs, beaten (that is, about 100g of beaten egg)
A dash of rum (optional)
One fève charm (optional)

Wash:
1 egg yolk
1 tsp milk

1. First make the frangipane. Combine the almonds, sugar and pinch of salt.

Add butter
2. Add the softened butter and squash it in, then cream it in fully. Keep creaming until the mixture becomes a paler colour.

Cream
3. Add the beaten egg, a little at a time, and the rum (if using) and beat to combine. Cover and put in the fridge while you prepare the pastry.

Beat till pale
4. Line a baking sheet with parchment.
5. Roll out the pastry then, using something round that fits your baking sheet, cut two discs. Mine were 230mm (9 inches) in diameter.

Cut out discs
6. Put both circles on the baking sheet with another piece of parchment in between, cover with plastic to stop them drying out and rest (them, not you) in the fridge.
7. Whisk together the egg yolk and milk for the wash.
8. Take the pastry and filling out of the fridge again and separate the discs.
9. Put the almond filling in the middle of the bottom piece of pastry, leaving about 25mm all the way around the edge.

Add filling
10. Put a fève in the mix, making sure no one sees where it’s hidden.
11. Brush the exposed edge of pastry with water, put the other disc of pastry on the top then seal together tightly.
12. You can chill again now, leaving it until ready, even overnight. Again, cover or put in a plastic bag to stop it drying out.
13. Preheat the oven to 200C.
14. Brush the glaze all over the top.

Glaze and incise top
15. With a sharp paring knife, cut a pattern on the top. Traditionally, this involves diagonal lines or curving sunrays, but you can be as creative as you want. Stab a few holes too, to allow steam to escape. You can scallop or crimp the edge too, but see the above note.
16. Bake for about 30 minutes or until crisp and golden. (As soon as it’s out of the oven, you can also give it an extra glaze with sugar syrup.)

Baked 1
17. Serve warm or at room temperature, topped with the paper crown.

And forget about those silly New Year’s pronouncements to punish yourself for overeating over Christmas. Just moderate! So, for example, don’t eat an entire galette des rois on your own, greedily trying to win that crown. Fran got it – or half of it at least, a flaw in the plan of using a walnut – in her first slice.

Fran as the Epiphany galette des rois queen


1 Most count Christmas Day as the First Day of Christmas, though some start with 26th December, St Stephen’s Day, the British Boxing Day. If you follow the Julian calendar, you have to wait until 6 January to start the Twelve Days of Christmas. Thanks Alex and Nick for informing me of that with your Ukrainian Christmas celebrations on our Epiphany, yesterday.

2 Called variously gâteau des rois or royaume or reiaume, roscón de reyes or rosca de reyes, corona dels reis, tortell de reis and bolo de reis.

3 Fran also conjectures that the word relates to the Gaelic gall, which means “stranger”, but also “rock, stone” but it all gets a bit confusing when you learn the Breton language name for Breton galettes is Krampouezhenn gwinizh du.


Addendum

My folks visited at the weekend, and brought with them something given to them by some friends who live in Normandy, who bought it in their local patisserie – it’s a brioche des rois, another variation on the kings cake theme. None of us were sure what the red slices of candied fruit were – apple perhaps?

Brioche des rois


12 Comments

Filed under Baking, Discussion, Feasts, Pies & tarts, Recipes

Christmas biscotti

Christmas biscotti

So I wanted to create an all-purpose biscotti recipe, an equivalent to this eminently useful customised cookie recipe where you just make a basic dough then chuck in whatever else you feel like. The plan was to have a recipe that I could adapt to utilise some Christmas flavours, some spices, some peel – and use up some pistachios that were sitting in storage while we didn’t have a kitchen during our 12 weeks-became-24 weeks building project.

Here’s the Christmas version. I’ll post the all-purpose version when I’ve tried a few more variables.

3 cardamom pods
3 cloves
nutmeg
1/2 tsp cinnamon
250g plain flour
200g sugar (caster or granulated)
1 tsp baking powder
(30g raw cacao powder, optional – I just had some)
pinch salt
3 medium eggs, beaten (QB, see below)
100g pistachio nuts
85g candied peel

1. Preheat the oven to 180C.
2. Line some baking sheets with parchment.
Christmas biscotti, spices

3. Prepare the spices: crack open the cardamom pods and take out the seeds then grind them up, along with the cloves. I use a mini electric grinder, but you could use a pestle and mortar (can’t find mine). Mix these spices with the cinnamon and a few grates of fresh nutmeg. Again, the spice mix is up to you really – all these spices are wonderfully evocative of mid-winter feasting to me, but if you don’t like or don’t have cardamom, for example, don’t worry.
4. Sieve together the flour, cacao powder if using, baking powder and spices and add the salt.
5. Make a dough by adding the beaten egg, a little at a time. You may not need to use it all. For example, my 3 medium eggs produced 170g of beaten egg, but I only needed 160g to make a dough that was malleable, not too dry, not too sticky. That’s QB – which is found in Italian recipes, is short for quanto basta, and means, “how much is enough”. In this case 160g was enough.

Christmas biscotti, dough
6. Add the nuts and peel and combine. Don’t knead it, it’s not bread, mix it just enough to homogenise.

Christmas biscotti, logs, unbaked
7. Form the dough into three slightly flattened logs, about 40-50mm wide, and place these on the baking sheets, sufficiently spaced for some spread.
8. Bake for about 20-25 minutes. You want the logs baked but not dried out, not still gooey. If they’re too gooey inside still, they’re hard to slice for the next stage and the second bake.

Christmas biscotti, logs, baked
9. Allow the logs to cool slightly then, with a serrated bread knife, slice, on a slight angle, into pieces about 10mm thick.
10. Return the biscuits to the baking sheets and bake again, for about 10-15 minutes. Take them out, turn them over, then bake again, to crisp up.

Christmas biscotti, sliced
11. Cool on a wire rack.

As they’re baked twice – biscotto literally means “twice baked” in Italian, from the Latin – they’ll be crisp and hard. They keep well in an airtight container and are suitable for dipping in a glass of desert wine, or a digestivo, or a hot drink if you’re being abstemious. It’s the season for abstemiousness right?

1 Comment

Filed under Baking, Biscuits, cookies, Recipes