Tag Archives: bread

Bread malfunction!

In my last post about bread-making, I mentioned that the previous two loaves I’d made had started out seeming fine but after a few days they went bad. The crumb, which had previously been firm and at that sweet-spot between dry and moist, started to collapse, becoming dense and damp in the centre. It wasn’t a problem I’d had before so I started wondering what was causing it: under-proving,  over-baking, some dodgy flour?

Or the heat.

Surely it was something to do with the heat? Although I baked with decent results last summer, when July and August similiarly peaked at around 40C  (100-plus in ye olde Fahrenheit), this year my bread seems to be suffering.

Even the nice durum wheat-strong bread flour loaf I baked last Thursday. Although it was great on Thursday and Friday, by Saturday morning, when we headed out of town for a night, it was suffering from the same problems. We got back last night, and the crust that was left was in a very sorry state.

So this is how it looked after it had cooled on the day of bake:

CU

And this is how it looked after three and a half days.

bread gone wrong

Sure it was a few days old, and getting stale (particularly around the edges, near the crust), but the core has gone all damp and dank, fizzy and yeasty. Not pleasant.

This yeastiness got me thinking: has it started fermenting again? The yeasts used in the dough were killed by the oven of course – the bread was baked at around 230C, and yeasts die at around 60C.  So are there wild yeasts in my bread bin for example? I mooted this question with my friend Michele. He’s not a baker, though he is a master brewer (at Mastri Birrai Umbri, whose wares we were enjoying Saturday night), so he knows his yeasts.

2013-07-27 20.29.52

He asked if I had fruit near where I stored the bread. Yes, I said, there’s a fruit bowl near the bread bin. It’s a great time of the year for seasonal fruit here in Roma – the region is cranking out apricots, plums, peaches, Coscia pears, figs, etc etc etc. Even someone like me who doesn’t much like fruit is enjoying this bounty.

But maybe it’s messing up my bread. Fruit, even when rinsed, has abundant wild yeast cultures on its skin.  Just think of advice you might have read about starting a natural leaven/sourdough: use some grapes, or raisins, or a some rhubarb (not strictly fruit, but close enough). These wild yeasts will be thriving at the moment, as the weather is humid and hot, as Rome heads for high summer. Even now, without the oven cranking at 240C, the kitchen is 30C. A pretty nice temperature for yeasts, moulds and bacteria.

So maybe the wild yeasts are finding my bread and starting to feed on it.  Which might indicate that I’ve not proved long enough, not leaving the yeast I’ve used in the bake long enough to cosume all the natural sugars in the flour. I’m not sure.

Fellow bakers – any thoughts?

4 Comments

Filed under Breads, Discussion, Flour & grain

Durum wheat sponge and dough bread

Baked and cut durum and Manitoba bread

After my recent, pleasingly successful experiment with a biga, I made a couple of loaves that seemed wonderful, but one turned out to be under-baked (shame on me), and the second just went weird after a few days. I think, like me, it can’t really handle the heat, as the Roman summer inches towards the trials of August, with  its high-30s (100 ish and more old money) temperatures, and thriving tiger mosquito population.

I made a multigrain seeded loaf that seemed great the first few slices, but didn’t like being taken to the park for a picnic in 35C temperatures (followed by a massive storm). The previously nice, firm crumb collapsed and went kind of fizzy. Again, it was as it if had been under-baked. And possibly even under-proved, though this is bizarre as it’d had a nice long prove, mostly in the fridge as the 25C kitchen was too warm.

To try and diagnose this mystery, I vowed I’d make a nice simple white loaf, just with strong white flour (or Manitoba as it’s known in Italy) and see how it coped with the heat.

Farina di grano duro and farina di Manitoba

Every time I open my flour bin, however, I see a pack of something that needs a bit of stock-rotation. In this case, I wanted to use up some of a bag of grano duro flour, that is durum wheat, (Triticum durum). It’s a type of flour that is more typically used for pasta, but I’ve baked with it before. I also had a bag of rice flour hanging around, so some of that went in too.

Also, following the biga experiment, I decided to do a sponge and dough method. Just to see if it coped better with the heat than the previous two loaves, that were made with the bulk fermentation method (BFM).

The BFM is your basic bread-making that involves creating a dough with all the flour, all the water, all the yeast, and processing that: first prove, shaping, second prove, bake. The sponge and dough method, on the other hand, involves using liquid (all or most of it) and part of the flour, with the yeast, then fermenting that more liquid mixture, called the sponge, before adding the rest of the flour and proceeding with a dough, proving, shaping and baking. Like a biga, a sponge is a type of pre-ferment.

Duro-Manitoba sponge

A note on the yeast
I use fresh yeast. It’s known as lievito di birra in Italy, or cake yeast in North America.

If you’ve only got active dried yeast (ADY), use 4g. If you’ve only got instant/easyblend yeast, use 3g. Add the latter directly to the part of the flour you’re mixing with the liquid to make the sponge.

A basic rule of thumb for conversion is x3: that is, 3g ADY = 9g fresh yeast. You need less instant yeast than ADY. But I wouldn’t agonise: as long as your least is alive and well and happy, it’ll do what it needs to do even with a few gram’s variation. The time it takes the dough to ferment and prove will also vary depending on the temperature of water you use, the temperature of your kitchen, etc.

Ingredients
200g grano duro/durum wheat flour
50g rice flour
250g strong white/Manitoba flour (00 or 0 grade)
350g water (tepid)
10g fresh yeast
10g fine sea salt

Dough, unkneaded

Method
1. Combine the water and yeast in a bowl. Whisk slightly to break up the yeast.
2. Combine all the flours in a bowl.
3. Put half of the flour mix in another bowl. Add the water/yeast mixture.
4. Stir together the flour and water/yeast to make a sponge.
5. Leave the sponge , covered, to ferment. I left mine for about 80 minutes in a warm kitchen. It should look nice and bubbly and active when it’s ready.
6. Add the salt to the remaining dry flour, mix it in, then add this to the sponge.
7. Bring the dough together in the bowl, turning it out when it’s mostly combined.
8. Knead the dough until smooth. You can do a longer knead once, or the Dan Lepard method of short kneads three times in half an hour.

Dough, kneaded
9. Form a ball of dough and place it in a clean bowl. I add a drop of veg oil to the bowl for nonstickiness.
10. Cover and leave to prove until doubled in size. Again, depends on temps etc, so check every now and then. It’ll probably be around one and a half hours if it’s in a warm place.

Dough, first prove
11. Turn out the dough, and form a ball.
12. Leave the ball to rest for 10 minutes.
13. Form a baton.
14. Leave the baton to prove again, ideally in a basket or banneton lined with floured cloth.

Dough, in proving basket
15. Pre-heat oven to 220C.
16. When the baton is doubled in size and soft to the touch, turn out onto a baking sheet.
17. Bake for around 25 minutes, then turn down the heat to 200C and bake for another 20 minutes, or until the loaf is well-browned and feels fairly light and ‘hollow’ when picked up.
18. Cool on a wire rack.

Dough, in proving basket, proved

Thus far, this bread has been behaving – and not giving me any insights into what went wrong with my previous loaf. If the crumb suddenly collapses and starts to ferment, I’ll report back.

Leave a comment

Filed under Breads, Recipes

Biga 2: making a loaf

freshly cut biga loaf

After visiting Il Vecchio Forno in Pescasseroli, Abruzzo, and getting advice from the master baker, I had to try making bread using a biga.

Although I’ve experimented a lot with natural leavens (sourdough), sponge and dough techniques and long fermentations of the finished dough (such as overnight in the fridge), I’ve never actually tried to make bread based specifically on the biga technique, that is using a low-hydration Italian style pre-ferment. This is still experimental though, as I’ve not made a strict biga – I had a healthy batch of leaven around, so I’ve added some of that. Also, I didn’t have enough of one type of flour, so I’ve done a mixture.

The flour types I used were a 0 grano tenero, at 11.5% protein, and a 0 Manitoba at 15.5% protein, W360-400. For an explanation of Italian flour types, see here. For a description of what the heck “W” means in this context, see my previous post.

mixing the biga

Biga

500g flour (370g grano tenero, 130g Manitoba)
250g water (cold, you don’t need to rush the yeast)
5g fresh yeast
30g leaven (at 80% hydration)

biga, before fermentation

1 Dissolve the yeast and leaven in the cold water, giving it a whisk.
2 Add the liquid to the flour in a roomy bowl, and combine.
3 Turn out the mixture onto a lightly oiled surface and bring the dough together. It’ll be quite firm, as it’s only 50% (give or take) hydration at this point
4 Put the biga in a container with a lid.
5 I left mine at room temperature to ferment for half an hour then put it in the fridge… because a) it’s warm here, around 25C (77F) and b) because I had to go out (to a gig).
6 Leave the biga in the fridge for 10-14 hours, until it is soft and relatively lively. It won’t be lively like a liquid leaven as it’s effectively a fairly dry dough.

biga, after fermentation

Bread dough

200g more flour (Manitoba/strong white bread flour)
200g water
10g salt

pieces of biga

1 Take the biga out of the fridge. You can leave it as is, but one site I read suggested cutting into pieces, which seemed like a good idea. Why? Because it’ll warm up more evenly that way and it’ll be easier to combine into the final dough.
2 Cover the pieces and leave to come up to room temperature for an hour or so.
3 In a roomy bowl, combine 200g flour, 200g water and 10g salt, making a pasty mixture.
4 Add all the biga pieces, and mix well, with a spatula and your hands. Really get in there and squeeze it all together, to help form one uniform dough.

making a biga dough
5 Turn the mixture out of the bowl onto a lightly oiled surface and bring together the dough. At this point, it’s around 65% hydration, so it should be moist without being totally sticky and awkward to handle.
6 Form a ball and return to the roomy bowl (lightly oiled).

dough, ball
7 Cover (I used a shower cap), and leave to prove until it’s doubled in size and soft. Time will vary but it took 1 1/2 hours for me. My kitchen was warm, up to 26C (79F).

dough, end of first prove
8 Turn out the dough. It should weigh around 1.2kg, so you could make two smaller loaves, but I wanted to make one large-ish loaf. Form a ball, then leave to rest for about 10 minutes.
9 Form a baton, then place, seam-side up, in a proving basket lined with a floured cloth.

baton
10 Prove again. I left mine for half an hour in the warm kitchen, and it was nice and soft (morbido). I probably could have left it a bit longer – you want it soft and springy.

final prove
11 Turn the dough out onto a baking sheet lined with parchment (I sprinkled mine with coarse cornmeal). Slash the top in your preferred manner.

ready to bake
12 Put a dish of boiling water in the bottom of the oven to fill the oven with steam, preheated to 220C. My oven takes ages to come to temperature but you might have a new-fangled type that heats in 10 minutes. Lucky you.
13 Bake for 25 minutes, then turn the heat down to 200C and keep baking for another 20 minutes. I left mine another 10 minutes, trying to get some colour on top.

Results

All in all, this is one of the better loaves I’ve made recently. Despite our oven not really having any top heat to colour the crust, the rudimentary steam system (domestically, I prefer to use a mister spray, but I ain’t got one at the moment) gave the crust a reasonable crisp crunchiness. The crumb isn’t particularly open, but it’s soft.

Best of all, I got a decent oven spring! I’ve been struggling with the form of my loaves recently. I doubt this decent shape is the result of the biga per se, it may well be more because the dough was a lower hydration than other doughs I’ve made recently (more usually 70% hydration) and because the Manitoba is easier to handle and glutinous then the farro flours and whatnot I’ve been playing with.

I’m not sure my loaf is really a genuine rustic Italian style bread: with its fairly close and soft crumb, it’s more like a classic British bloomer. But hey, I’m happy with that for a first try.

Oh, and yes, from the cracking it was clearly a little underproved, but not radically so.

fresh from oven

Bakers’ percentages

If you’re not familiar with bakers’ percentages, they’re just a way of expressing the proportion of ingredients as a percentage of the flour – or more precisely a percentage of the flour weight. This blog provides a good explanation, if you’re in the mood for some maths.

So, the total ingredients here, including both the biga and the final dough are:

700g flour
450g water
30g leaven
5g yeast (fresh yeast, aka lievito di birra)
10g salt

However, if I break down the leaven, more accurately this means:
717g flour
463g water
5g yeast
10g salt

As bakers’ percentages this is:
100% flour
65% water
0.7% yeast
1.4% salt

Having said all that, I’m sure I’ll keep playing with this technique, and experiment more with quantities – playing with the qb, or quantobasta. This is the “how much is enough”, the quantities that, more intuitively, feel right. (Something that’s discussed by Rachel over here). For starters I think the biga I made was too low hydration, despite the maestro’s advice. So I’ll increase the water, or, if I’m using more of my high hydration leaven (to make a semi-biga, semi-madre), add more of that. Vediamo!

6 Comments

Filed under Breads, Recipes

Durum wheat bread with linseed and farro grains

grano duro, farro, linseed bread

Another one of my bread experiments. For some reason I’d ended up with two packets of farina di grano duro – that is, flour made from Triticum durum wheat (with duro meaning “hard” in Italian and Latin respectively.) It’s more typically used for making pasta, but it seems to be a reasonable bread component too and is used fairly widely. I have used it in the mix with good results before, such as in my Absurdly wholesome multigrain, multiseed loaf, but this one made with a much higher proportion of farina di grano duro.

So anyway.

100g farro grains. I used farro perlato. With farro here meaning farro dicocco (Triticum dicoccum), also known in English as emmer. You could use any type of wheat grain (such as spelt grains), or even, say, pearl barley.
50g linseed (“good for you mane and tail” as my friend Stephen McGrath of Newton Livery, NZ, once told me)
8g fresh yeast
300g cooking liquid from the grain (see below)
80g leaven
100g strong white flour (I used what’s known as “Manitoba” in Italy)
400g farina di grano duro / durum wheat flour or fine semolina flour
10g fine sea salt

1. Cook the farro grains in water until they’re soft but a little chewy. This can take around 20 minutes, but will more likely be more. Keep tasting them to check.
2. Strain the cooked grains, reserving the cooking water.
3. Weight out 150g of the cooked farro grains. (You can use any leftovers for other breads, or add them to salads.)

Cooked farro grain
4. Grind the linseed to break it up a bit but don’t completely pulverise. You can use a pestle and mortar, coffee grinder or even a liquidiser goblet.
5. Cover the broken linseed with a little of the cooking water. (This will help soften it up slightly before it’s added to the dough, but arguably isn’t strictly necessary.)
6. Combine the yeast, 300g of the grain cooking water and leaven and whisk together.
7. Put the flours and salt in a large bowl and mix slightly to distribute the salt.
8. Add the yeasty mix to the flours and bring to a dough.
9. Turn out onto a lightly oiled work surface and knead to combine. As this bread is using so much durum wheat, the dough won’t be as springy and stretchy as one made with a strong white bread flour.
10. Form a ball and return the dough to the bowl (cleaned). Rest for ten minutes, then knead again briefly. Repeat this process once more.
11. Gently stretch out the dough, then add the seeds and grains. Knead to combine.
12. Leave the dough to prove in a bowl covered with a clean cloth until it’s doubled in size. Times will vary, according to the temperature and the liveliness of your leaven.
13. Once the dough has doubled, take it out of the bowl and knead briefly and gently before forming a ball. Cover and rest for 10 minutes.
14. Tighten up the ball, then place in a proving basket or bowl lined with a floured cloth, with the smooth surface downwards and the “tucked” surface upwards.
15. Cover and prove again until doubled in size.
16. Preheat your oven to 220C.
17. Turn out the dough on onto a lined baking tray.
18. I brushed mine with egg white as I had some spare, but you could use whole egg or milk to give slightly different glazes.
19. Cut a cross.
20. Put in the oven and bake for 20 minutes, then turn down the oven to 200C and bake for a further 20 minutes.
21. If it’s baked enough (tap the bottom, check the colour; don’t be afraid to overbake a bit more if you’re not sure it’s done), take out and cool on a wire rack.
22. Eat as you see fit.

Prosciutto sandwich

Leave a comment

Filed under Breads, Recipes

Absurdly wholesome multigrain, multiseed bread

Multigrain, multiseed wholesome bread
I had a load of cooked farro grains left over, and needed some bread, so this came into being. It wasn’t an entirely happy experience. The dough was very moist and sticky, and I’ve really lost my moulding mojo recently, so there was a bit of a (one-man) scene in the kitchen. Then it didn’t really have much in the way of oven spring*, hence the slightly sad shape. BUT, and here’s the important thing, it tastes great.

It’s a ridiculously wholesome loaf that would make a spongey British “Granary” go and hang its head in shame. It’s firm, moist, with a good crust and eminently satisfying to bite. Great with cheese or for a peanut butter sarnie.

And yes, I might be a food blogger based Rome, but this isn’t a Roman bread. I made it up, in part inspired by Dan Lepard‘s Five-grain loaf (in The Handmade Loaf). As Mr Lepard spent a lot of time in Italy learning his trade, I suspect he took his inspiration for that loaf in part from Italian multicereali (multigrain) breads. So this is a distant cousin to, say, the wonderful multicereali that you can get from Roscioli, or the multicereali I got last week from the Testaccio Ex-Mattatoio farmers market, which the baker called Pane di brigante. He explained he called it that as his area, in the hills south of Rome, used to be full of brandits, brigands.

As I made it up on the fly, these quantities can’t pretend to be exact. You want a nice moisty dough, but don’t get yourself in a lather (like I did). If it feels too wet, add some more flour. And use whatever seeds you have to hand.

400g cooked spelt grains (Dry grain simmered in water until soft, then drained – reserving the cooking water. I used farro perlato.)

Mix in a large bowl:
300g white spelt flour. I used stoneground organic farina di farro bianco.
300g fine durum wheat flour. I used a stoneground organic farina di grano duro.
10g sea salt

Combine in another bowl:
15g fresh yeast, crumbled
100g leaven (100% hydration. I’ve done it with leavens fed on emmer, spelt or modern wheat)
50g honey
350g grain cooking water (tepid, not hot), made up with ordinary water if necessary

Combine in small bowl and add a little water (to soften):
20g linseed (broken up slighty with a pestle and mortar or in a coffee grinder)
20g  poppyseeds
20g  sunflower seeds
20g pumpkin seeds
20g sesame seeds

1 Make the dough by adding the ferment (yeast, water, leaven etc) to the flours and salt mix.
2 Mix well with a spatula or spoon, then turn out on to worksurface.
3 Knead until well combined.
4 Stretch the dough, add the grain and seeds.
5 Fold over the dough, then gently kneed again to combine the grain and seeds.
6 Adjust the dough if it’s too wet or indeed too dry by adding more flour or liquid accordingly.
7 Form into a ball, then leave to rest in a bowl covered with a moist tea towel.
8 After 10 minutes, give it another knead.
9 Rest another 10 minutes.
10 Give it another gentle knead.
11 Return to the bowl, cover and prove until doubled in volume.
12 Turn out the dough, and press it out to equalise the gas pockets. (We always called this “knocking back” in British baking, but that encourages unnecessary violence towards your tender dough.)
13 Weigh dough and divide into two equal portions, each around 850g.
14 Shape each portion into a ball, then leave to rest for 10 minutes, covered.
15 Shape as you like. I was planning batons, but after my tantrum I went with the easy option: tin loaves.
16 Preheat oven to 220C.
17 Prove again until ready to bake: the dough should be wobbly, plump and soft.
18 Brush with beaten egg, sprinkle with seeds. Cut along the length (my cut was pathetic).
19 Bake 20 minutes, then turn down the heat to 200C.
20 Remove from the tins then retun to the oven for another 10 minutes or so. (As the dough was damp, and contained the moist farro grains, I reasoned it could do with a little more time to bake through.)
21 Cool on a wire rack.
22 Enjoy.

(Part of the reason I’m pleased with this one is that it reminds me of the bread made by my friend and sometime cooking mentor Nadia, all the way over there in New Zealand. It looks quite similar to her bread, and even tastes similar despite the distance and different provenance of the ingredients. Arohanui to Nadia and all the Aotearoa whanau!)

Addendum
Making this again today, 6 February 2013, and noticed a few errors, now amended. I also thought it was about time I added bakers’ percentages. So here we go.

Note, the seeds are soaked in water to soften them slightly, but I think the amount is negligible so I’ve not factored it in.

Basic percentages (ie not factoring in the leaven composition)

Ingredient Weight Bakers’ percentage
Spelt grains 400g 67%
Flour 600g 100%
Salt 10g 1.7%
Fresh yeast 15g 2.5%
Leaven (at 100%) 100g 17%
Honey 50g 8.3%
Water 350g 58%
Linseeds 20g 3.3%
Poppyseeds 20g 3.3%
Sunflower seeds 20g 3.3%
Pumpkin seeds 20g 3.3%
Sesame seeds 20g 3.3%

Percentages factoring in the leaven composition (100g at 100%, ie add 50g to water weight, 50g to flour weight)

Ingredient Weight Bakers’ percentage
Spelt grains 400g 62%
Flour 650g 100%
Salt 10g 1.5%
Fresh yeast 15g 2.3%
Honey 50g 7.7%
Water 400g 62%
Linseeds 20g 3%
Poppyseeds 20g 3%
Sunflower seeds 20g 3%
Pumpkin seeds 20g 3%
Sesame seeds 20g 3%

It doesn’t seem like a very high hydration recipe, but bear in mind it contains a lot of cooked spelt grain: and this is very moist.


* Oven spring – the final burst of growth made by bread dough when it goes into the oven. It’s caused by the heat exciting the yeast, which gets all hyperactive, farts out more gas, causing the dough to rise rapidly. Then the yeast dies is killed, when it gets heated over around 60C. Boo hoo. And gets eaten. The horror! You can get better oven spring with steam (it moistens the dough, conducting the heat into it more efficiiently). However, getting reliable steam in a domestic oven is a bit hit and miss, despite what people suggest about pouring boiling water into trays anor using a mister-spray.

2 Comments

Filed under Baking, Breads, Recipes

Spelt experiments, or When bread goes wrong, and the dilemma of blogging the failures

So I was feeling experimental this week. I’d been both looking at old photos of breads I’ve made the past few years and browsing my favourite baking book, looking for inspiration. One of the breads I liked but haven’t tried too often is a 100 percent sourdough with some potato in the mix. I’d had great results once – a bread with a great, irregular crumb, which is something of a holy grail for bakers like me. It requires a high hydration dough and, generally, a natural leaven. It’s not something I’ve had much luck with lately, but I had done back in Blighty with a better kitchen and more familiar ingredients. I can’t find a photo of the bread in question, but here’s one with the kind of crumb I mean.

Okay, thought I, I’ll try that again – but with farro flour. Indeed, I’m going through a bit of a phase trying to use farro bianco all over the place, where, if I was still living in the UK, I’d use strong white or even plain flour.

I revived my leaven over a few days, then got stuck in. Feeling optimistic, taking photos to record the process, thinking I could proudly blog the results, imagining cutting open a loaf with a crunchy crust and finding that wonderful irregular crumb structure again.

Except it didn’t go well. The bread is borderline terrible. Dense, heavy, and clearly lacking in life, with no oven spring. It tastes strangely like a teabread.

This left me with a dilemma. It’s one that’s probably faced by anyone who likes to make food and blog about it. If you make something, and it’s crap, should you blog about it? You of course want you food to look marvellous when you shove it out here on the interweb. But then I thought, Hang-on, this isn’t a glossy magazine or a recipe book, it’s a blog. It’s record of my endeavours, and not just the successes. So why shouldn’t I blog the failures? Or at least talk about the agonies of deciding whether to go public with the failures. And if by some miracle this is read by experts, perhaps that can give advice. (Yeah, right. Ed.)

So anyway, this is the recipe I used, a variation on Dan Lepard’s Crusty potato bread
250g leaven (mine was fed with farro, 80% hydration)
280g water
25g honey
75g unpeeled potato, scrubbed and grated
500g farro bianco flour
10g fine sea salt

1 Combine the leaven, water, honey and potato.
2 Add the flour and salt and blend to create a wet, sticky dough.
3 Rest for 10-15 minutes.
4 Turn out onto a lightly oiled work surface and give it a brief knead.
5 Return to a lightly oiled bowl and rest for around 10-15 minutes.
6 Repeat this process (it’s Dan L’s process, developed while he worked in a busy kitchen. In some ways it’s irritating – kneading, cleaning up, waiting, kneading, cleaning up, waiting – but in others it’s great. It seems particularly good for handling wetter doughs).
7 Repeat again 2-3 more times, then leave the dough covered for half an hour. Give the dough a fold if you like.
8 Divide the dough into two equal pieces and shape each into a ball.
9 Rest the balls, again covered, for about 10-15 minutes.
10 Shape batons, then place then in proving baskets lined with floured clothes, or if you ain’t gone none, place side my side on floured clothes, covered.
11 Leave again until doubled in size. This will vary according to the temperature of your room, but if it’s warm (around 20C) it’ll be around 4-5 hours.
12 Heat oven to 220C.
13 Turn out the loaves onto a baking sheet lined with parchment and dusted with semolina.
14 Bake for 20 minutes, then turn down the oven to 200C and bake for another 20 minutes.

So anyway, after all that, mine didn’t work. But if you use strong white flour instead, there’s a chance yours could. And if they do, it’s a lovely lovely bread.

Now for some diagnosis, some thoughts about why my bread didn’t work
1 The recipe really doesn’t like spelt flour. Although spelt has a not dissimilar proportion of protein to a strong white bread flour (around 14-15%), it has different proteins, which some sources refer to as “extremely fragile”. Compared to modern wheat varieties, it has less gluten, particularly gliadin, the protein that is integral to making easy stretchy white doughs. I’ve made plenty of decent loaves with spelt in the mix recently (like this one), but I think this is my first 100 percent spelt, 100 percent naturally leavened.
Which leads me to…
2 The leaven wasn’t sufficiently active. I perhaps should have fed and refreshed it over a few more days. Or maybe its current residents just aren’t happy with their conditions. It is Rome after all – so maybe it’s some kind of yeasty sciopero.
3 Or if I didn’t refresh it enough, I should have at least left the dough fermenting longer. It’s the winter, and our kitchen isn’t that warm, probably only around 15C (until I put the oven on). So yes, if it’s cold, it’ll take longer to ferment.
4 Except I also worry that if I left it fermenting too long, the yeasts would finish gorging themselves and any rise achieved would collapse back in on itself.
5 Some sources also talk about how you have to adjust the water. Well, I reduced it slightly from Dan L’s original recipe, and the dough did feel pretty good while I was working it. I dunno though , this place says “Too much [water], and the dough is sticky and weak and will not be able to hold the gasses that are produced during the fermentation process.”
6 Some other random factor. Like some unprecedented chemical reaction between the spud and the spelt. I know not.

Anyway, if you are a baker, and have any thoughts about what might have gone wrong here, please share!

In the meantime, I have to decide whether to continue my spelt experiments (I also used them in some brownies yesterday) or retreat to the comfort of strong white bread flour, or Manitoba as it’s known here in Italy, with its reliable if dietarily dubious gliadin and glutenin content.

Addendum

Here’s the recipe as baker’s percentages. I’m doing this partly because I’m getting out of practice and partly in response to talking to Jeremy.

250/500 = 0.5 x 100 = 50% leaven
280/500 = 0.56 x 100 = 56% water
25/500 = 0.05 x 100= 5% honey
75/500 = 0.15 x 100= 15% potato
500/500 = 1 x 100 = 100% flour
10/500 = 0.02 x 100 = 2% salt

Or if we’re getting serious (and it looks like we are), and factoring in the leaven… 250g leaven at 80% hydration = 112g water + 138g flour (rounded), so the total water is actually
392g, and the total flour is 638g.

392/638 = 0.61 x 100 = 61% water
25/638 = 0.039 x 100 = 3.9% honey
75/638 = 0.118 x 100 = 11.8% potato
638/638 = 1 x 100 = 100% flour
10/638 = 0.015 x 100 = 1.6% salt

12 Comments

Filed under Breads, Discussion, Flour & grain, Recipes

Pane di San Martino

In the autumn of 2011, I noticed bags of a yellow-ish powder on a stall in the farmers’ market in the Ex-Mattatoio in Testaccio, Rome. It was farina di castagna – chestnut flour. That is, flour made from the dried and milled nuts of Castanea sativa, the sweet chestnut tree.

At the time, I experimented with it. A friend commented that there is in fact a traditional Italian bread made with chestnut flour, called pane di San Martino, or St Martin’s bread. The feast day of St Martin is 11 November, just around the time the year’s chestnut flour becomes available.

Anyway, I mentioned this bread to a teacher who I was doing a (food-focussed) conversation class with. She dug out a recipe. Well, she clearly Googled a recipe, as a quick Google myself soon found her source, which is here (in Italian).

After having gone through all that, I then completely failed to try the recipe. A year went by, autumn returned – and so too did the chestnuts, and chestnut flour. So last week I bought a new pack, and determined to revisit the pane di San Martino recipe.

Firstly, however, I had to translate it.

It talked in vague terms: “Prendere mezzo mestolo di farina di castagne e mezzo mestolo di farina di frumento…”, that is “Take half a ladle of chestnut flour and half a ladle of wheat flour…” But which ladle? I’m not a fan of the cup measure in recipes – especially as a US and an Australian cup, say, are different sizes. But what about an Italian ladle? I had two in my kitchen, one medium-small, one medium-large. Was either suitable? I plumped for using the medium-large one, and weighing the flours in grams. (If you’re interesting in scaling up recipes, using grams and kilos makes things a lot easier, in part as the maths are more manageable when you’re working with percentages and a measures based around factors of ten. Ounces smounces.)

Anyway, I translated and converted the recipe, but it still wasn’t quite right in terms of the liquid/dry quantities, so I also revised it while making the dough. Indeed, all flours have different absorbency, so you will have to have a feel for dough when you’re adding mixing the water and flours. This time, I used an organic, stoneground farro bianco – white spelt – flour from the renowned Marino Mulino. If you use a wholewheat flour it will require a more water than a white flour.

So. Pane di San Martino. My teacher gave me some notes that said this bread is found from Emilia-Romagna in north Italy to Salento, in Puglia, the heel. I’ve never seen it in Rome though. In fact, I’ll come clean and say I’ve never seen it anywhere, in the crumby flesh. So although my version is based on an Italian recipe, my version has no claim to authenticity. Which might upset an Italian baker, but shouldn’t be a problem if you stumble upon this recipe from other climes.

The recipe uses both a leaven (sourdough culture) and fresh yeast. This is a technique used by one of my favourite bakers, Dan Lepard, though it might upset some purists. OK, purists, that’s two warnings now.

Make a sponge with:
50g chestnut flour
50g of wheat or spelt flour
12g fresh yeast
50g wheat or spelt leaven/sourdough culture (100% hydration – that is, made with 50% water, 50% flour)
180g tepid water

Cover and leave to ferment for around two hours.

Make a dough with:
The pre-ferment
350g wheat or spelt flour
250g chestnut flour
300g water. Add more if the dough feels too tight.
20g olive oil
12g salt

Combine with a spoon or spatula. You want a moist dough. Don’t be afraid to add more water. When it’s a good consistency, knead to combine.

Cover and leave to rest for 10 minutes.

Add:
180g walnuts and knead gently to combine.

Cover and leave to rest for 10 minutes.

As the original recipe didn’t involve first and second proving periods, nor does this version. (I think I may work on this recipe though, and adjust the proving. Watch this space.)

Weigh the dough and divide in two. Form two balls, then leave these to prove in baskets or bowls lined with flour clothes.

Leave to rest for around two hours in a warm place away from draughts. Timing will vary depending on the temperature of where your prove the dough.

Preheat the oven to 220C.

Line a baking sheet with parchment. (I’m not using a stone at the moment, just a fierce domestic gas oven.)

When the dough feels springy and alive, almost jelly-like, you’re ready to bake.
Gently upturn the proving baskets/bowls onto the baking sheet.
Make cuts in the top – you can make slashes how you feel, as long as you use a sharp blade and don’t drag at the dough. (Slashes in a loaf used to be the owner’s signature when people used communal village bread ovens.)

Bake for 20 minutes, then reduce the temperature to 200C and bake for a further 20 minutes.

You want the loaf to have a nice colour, and sound hollow when you knock on the bottom. (This isn’t an exact science either but if it sounds hollow, that’s some indication the dough isn’t still soggy and doughy inside, instead it’s baked and dry.)

Leave to cool on a wire rack.

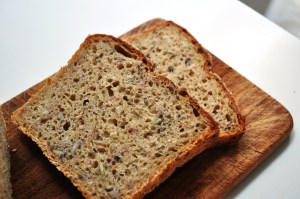
The resulting bread is sweet, almost cake-like, and pleasant for breakfast or afternoon tea, and makes good toast when it’s aged past its initial softness.

Addedum
The great travel writer Eric Newby had a strong connection to Italy – he hid in the Italian mountains during WWII, as described in his wonderful Love and War in the Apennines, and he and his wife – who he met during the war – returned there many times, eventually buying a house in the mountains in 1967. It was called I Castagni, “The Chestnuts”; on the theme of said foodstuff, in A Small Place in Italy he writes “This room extended the whole height of the building and had originally been constructed for the purpose of drying chestnuts. They were laid out and dried over a fire that had a chimney which extended up to the height of the roof. When they were dry they were ground up into a pale, brownish flour and used to make a rather sickly, sweetish sort of bread called castagnaccia which, until long after the last war, was a staple food in many parts of mountain Italy.”

Later on, he writes more about the importance of chestnut trees for “the principle necessities of life”, from building materials to food, specifically castagnaccia, “what had been a stabple food that most old contadini [peasants] now wanted to forget they had ever eaten, because of the memories it brought back of long years of poverty.” Interestingly, the suffix -accio / -accia often indicates a perjorative, so castagnaccia could be translated – very loosely – as “yucky chestnut bread”.

3 Comments

Filed under Baking, Breads, Recipes

Some photos of bread

Here’s a set of photos on Flickr of bread I’ve made over the past few years.

The likes of those lovely fougasse, based on the recipe in Richard Bertinet’s book Dough.

1 Comment

Filed under Breads, Discussion

Chestnut and walnut bread


Chestnuts were an important traditional foodstuff in parts of Italy. Peasants could supplement their diets with chestnuts, and flour was a natural extension of this. Roasted chestnuts remain a common sight in Roma over the winter, though I’m skeptical about whether this is because Romans demand it, or because it’s another cute novelty to sell to tourists.

Anyway, I bought some chestnut flour – farina di castagna – from the Testaccio Ex-Mattatoio producers’ market last weekend, on a whim. Didn’t really have any idea what to do with it. And nor do I particularly like chestnuts. Living in New Zealand years ago, some friends who tried to live as much as possible by foraging provided enough for me to eat far too many, resulting in a certain aversion. Which might not sound promising, but bear with me.

After a bit of Googling and polling friends, I plan to use it to make various items at some stage, including the Italian traditional castagnaccio – a kind of peasant cake that doesn’t include sugar and instead realies on the natural sweetness of chestnuts. (Chestnut flour is also known as farina dolce – sweet flour.) Also: chestnut flour pancakes (maybe on Shrove Tuesday, which is looming) and this cake, which comes from a gluten-free angle. If I can work out a replacement for crème fraîche, which isn’t readily available here in Roma. Apparently I can use panna acida.

But first, I made some bread, inspired by a recipe in Richard Bertinet’s Dough. His version uses rye flour; here I replaced that with chestnut flour. I also reduced the yeast in his recipe and added some white leaven. What the hell.

So:
400g strong white flour
100g chestnut flour
10g salt
320g water
6g fresh (fresh)
50g white leaven (100% hydration)

Combine the flours and salt.
Whisk together the leaven, yeast and water (warm – use dough temp x 2 minus flour temp to give you a water temp… or just warm…).
Add liquid to flours, bring to a dough.
Knead.
Form a ball, rest, covered, until doubled in height. I’m not going to suggest a time, as that really is so dependant on the temperature of your room.
I divided it into two, formed balls, rested 10 mins then I made rings, but really, knock yourself out with the shape.
Prove again, until doubled in height.
Bake at 220C for 15 mins, then lower temp to 200C and bake another 15 mins. Or if you’re doing one large loaf, it may need longer. Trust your judgment!

And you know what, it’s yummy. The nuts give the crumb a slight purply tinge and the taste is indeed subtly sweet.

I really ought to try and take better pictures though. Random snaps from my phone don’t cut it. And that tablecloth is getting a bit overused as a backdrop.

9 Comments

Filed under Baking, Food misc, Main thread, Rome

Wholewheat farro bread


Invented this one as I had some farro grain, which I’d bought when I was trying to make the Tuscan zuppa di fagioli e farro, aka bean and farro soup. Farro itself is a type of wheat grain, though the word can also be used to refer to barley and other grains, depending on where you are in Italy or who you’re talking to. Wikipedia has a good page, which doesn’t really clarify!

I played it by ear (well, by fingers) with some of the quantities, and I wanted to keep the dough very soft and wet – hence it flattened slightly when I moved it from the proving basket to bake. But flavour-wise, it’s great.

I’ve been struggling to get used to Italian flours. Many of them are low protein, unlike your standard British bread flour, which is ground from harder wheat. Harder wheat produces stronger flour, with more protein, say 13% or higher – giving the requisite gluten proteins to create certain bread structures, for the types of bread we’re more used to making in the UK.

Anyway, the recipe:

Cook about 50g of farro in water, simmering for about 45 minutes, until the grain is soft.
(You could use the cooking water for the sponge, though I didn’t in this case. You can also soak the grain overnight in ale, wine or friuit juice, if you’re interested in experimenting! Also, if you can’t get farro, wheat grains, aka wheat berries, would be fine.)

Make a sponge with:
360g water
250g wholewheat flour (I used an Italian integrale)
10g fresh yeast (or say 5g ADY if you can’t find fresh)

Leave the sponge to ferment for 8-12 hours. I did it overnight, in a fairly cold kitchen. (We’re in Rome, but it is January – nights getting down to around 0C.)

Make up the dough with:
The sponge
10g salt
150g wholewheat flour
100g white bread flour (I used an Italian bread which, despite being called “Farina di grano duro” – flour from hard wheat – and professing to be “per pane, focacce e dolci” – for bread, foccacia and sweets – is only 10% protein. See my perplexity? It worked ok though, so you could use a British plain flour.)

Bring the dough together and add the farro grains.
Knead. It’s sticky, that’s good, don’t worry!
Clean off your hands with some extra flour and bring the dough to a ball.
Ferment, covered, for about 4 hours, or until doubled in size.
I gave mine a few turns.
Turn out, form a ball, and rest for 10 minutes.
I formed a baton and proved it in a 36cm (14″) long basket.
Final prove until doubled in volume.
I turned it onto a baking sheet and made one long dorsal cut.

Bake in a preheated oven at 220C for 20 minutes, then turn down to 200C and bake for another 20 minutes. Or thereabouts.

2 Comments

Filed under Baking, Main thread